
I finally took the plunge and moved from from Unraid to Proxmox VE.
I used to love Unraid, but at some point the easy to use web management UI and app store ecosystem simply lacked capabilities I needed for deployment automation and configuration tasks. Then there is the problem with the poor IO performance, that I’ve written several posts on, and excessive SSD writes wearing out drives, that have remained unresolved, and no solution seems to be forthcoming.
As I’ve expanded my home automation setup, I adopted Ansible and Docker-Compose for system deployment, and all my configurations are maintained in a private GitHub repository. On a vanilla Ubuntu Server setup I can go from from fresh install to fully configured and operational in minutes. On Unraid it requires jumping through hoops, it is not impossible, it is just troublesome as it goes against Unraid’s intended mode of operation.
I distilled my requirements of a replacement system as follows:
- Popular mainstream Linux distribution.
- Strong community support.
- KVM for virtual machines.
- Docker for containers.
- ZFS for the filesystem.
- Web UI for basic configuration and monitoring.
I have two similar server systems in my home lab, similar in all aspects except hard drives. I typically use the first for production, and the second for testing and experimentation.
I started my testing with Ubuntu Server 20.04 LTS, but soon discovered that several 3rd party components, including Ansible, are (at time of writing) not yet ready for 20.04, and I reverted to Ubuntu Server 18.04 LTS. I used Docker-Compose to create my service stacks, Portainer for basic container configuration and monitoring, and Watchtower to keep the containers updated. I used Cockpit, with the ZFS plugin, for system web management and monitoring, but I found the functionality just too shallow. Especially for KVM and QEMU where I have very little familiarity with the KVM CLI. I am familiar with Glances and NetData for monitoring, and use both. I do not like Virt Manager, and several of the other KVM web management tools are underwhelming or require excessive infrastructure.
I tried openmediavault again, I last tried it when I moved to Unraid. It suffers from similar problems as Unraid where the ease of use gets in the way of automation and configurability, and general adoption is still low. OMV containers are LXC, not Docker, but it is based on Debian, so Docker can be installed.
I tried FreeNAS again, and I was impressed by how much the web UI improved from the last time I tried it, the upcoming Core release looks even more impressive. FreeNAS containers are Jails, not Docker, but because FreeNAS is based on FreeBSD, and there is no Docker for FreeBSD, Docker cannot be installed on FreeNAS, but it can be installed in a VM.
I tried Proxmox VE for the first time, it is based on Debian, includes KVM and LXC, and supports multi-server clustering capabilities (that I don’t need). It has a free and commercial support offering, with an active community, and is often cited by STH, where I first heard about it. It has a web monitoring and configuration UI, and good management UI for KVM and LXC. PVE does not include Docker or Samba, but they can be installed on the Debian host.
There is a pattern here with LXC natively supported, but Docker not, maybe old vs. new? If you search for or ask how to install Docker on OMV or FreeNAS or PVE, the first responses are invariably why not just use LXC? I think of Docker Hub as the modern cloud equivalent of app stores, everybody publishes there, and everybody looks for apps there. Nothing close to Docker Hub exists for LXC.
With the need to install Docker, I need to consider if I will install on the base OS, or inside a LXC or VM. For me the deciding factor was ZFS; if I install in a LXC or VM I cannot utilize the underlying ZFS capabilities, while if I install on the host, I get all the capabilities of ZFS, most notably datasets, snapshots and quotas. Virtio-FS may eventually change this, but for now I am installing Docker and Samba directly on the host.
I decided to go with Proxmox VE, with ZFS, with Docker and Samba installed directly on the Debian host OS. PVE gives me confidence and reliability in getting the OS installed, updated, and configured. PVE gives me a good web UI for KVM configuration and host monitoring. I will still use NetData for monitoring, Portainer for container configuration and monitoring, and Watchtower to keep the containers updated. The rest is done via CLI, Docker-Compose, and Ansible.
As I had to do when I moved from Windows Server 2016 to Unraid, the critical parts are data migration, and I had quite a lot of data to move from Unraid to PVE. I had two basic choices for data migration; copy the Unraid XFS disks to ZFS disks on the same server, or copy the data to the secondary server and then copy it back.
To copy the data in-place would require extra disks to create the initial ZFS pool, then copy data from the Unraid XFS disks to ZFS, as the XFS disks are freed up, add them as mirror vdev’s to the pool, and repeat. For every 1 drive freed, I will need 2 drives for the ZFS mirror, this would mean I need more drives than I currently have.
The alternative is to provision enough (for data I want to keep) storage on a secondary server, rsync the data from Unraid to the secondary server, install PVE on the primary server (old Unraid server), configure ZFS pools, and then rsync the data back. I had enough old but functional drives to create a large enough RAIDZ1 pool, and opted for the copy-back option as it let me start fresh with my newer Seagate IronWolf 12TB drives on the PVE server.
I know, a large RAIDZ1 using old disks is risky, but I do have OneDrive and Backblaze B2 cloud backups of my most valuable data, so I was willing to take the chance, and I saved money by not having to buy any new drives.
Copying the data over gigabit ethernet using rsync over SSH adds quite a bit of overhead, and I was maxing out at around 6MBps. The typical google answer of using SSH with the arcfour cipher no longer works, as SSH no longer supports arcfour. Instead I deployd a rsyncd docker container, and rsyncd has no encryption overhead. Copying from Unraid using rsync -av --numeric-ids --delete server-1::share/ /mnt/unraidbackup/ runs at around 120MBps and maxes out the gigabit network, with about 8% CPU utilization.
At this rate it will take around a week to copy, and I decided to buy two used Mellanox MCX354A-FCBT ConnectX-3 VPI 40GbE Infiniband adapters, and connect the two servers using QSFP+ Direct Attach Copper cables. This will give a theoretical 40Gbps transfer rate, but the hard drives will max out at around 230MBps, still near double what I get over gigabit.
The ConnectX-3 VPI cards can operate as Infiniband or Ethernet, but when direct attaching two cards, they will default to Infiniband, and will not show up as Ethernet adapters in the systems. I found several articles and videos on how to change the mode from Auto/VPI to Ethernet, but it was surprisingly difficult to figure out how to install the tools required to make the change.
Here is a quick rundown of the required tasks, start by verifying that the adapter is installed:
root@server-2:/home/pieter# lspci | grep Mellanox
01:00.0 Ethernet controller: Mellanox Technologies MT27500 Family [ConnectX-3]
Update the firmware to the latest version using the mlxup utility:
root@server-2:/home/pieter# wget http://www.mellanox.com/downloads/firmware/mlxup/4.14.4/SFX/linux_x64/mlxup
...
root@server-2:/home/pieter# chmod +x mlxup
...
root@server-2:/home/pieter# ./mlxup -online
Querying Mellanox devices firmware ...

Device #1:
----------

  Device Type:      ConnectX3
  Part Number:      MCX354A-FCB_A2-A5
  Description:      ConnectX-3 VPI adapter card; dual-port QSFP; FDR IB (56Gb/s) and 40GigE; PCIe3.0 x8 8GT/s; RoHS R6
  PSID:             MT_1090120019
  PCI Device Name:  0000:01:00.0
  Port1 MAC:        248a07d78b61
  Port2 MAC:        248a07d78b62
  Versions:         Current        Available
     FW             2.42.5000      2.42.5000
     PXE            3.4.0752       3.4.0752

  Status:           Up to date
Install the mft firmware tools package:
root@server-2:/home/pieter# wget https://www.mellanox.com/downloads/MFT/mft-4.14.4-6-x86_64-deb.tgz
...
root@server-2:/home/pieter# tar zxvf mft-4.14.4-6-x86_64-deb.tgz
...
root@server-2:/home/pieter# cd ./mft-4.14.4-6-x86_64-deb
root@server-2:/home/pieter/mft-4.14.4-6-x86_64-deb# ./install.sh
-I- Removing all installed mft packages: mft  kernel-mft-dkms
-I- Installing package: /home/pieter/mft-4.14.4-6-x86_64-deb/SDEBS/kernel-mft-dkms_4.14.4-6_all.deb
-I- Installing package: /home/pieter/mft-4.14.4-6-x86_64-deb/DEBS/mft_4.14.4-6_amd64.deb
-I- In order to start mst, please run "mst start".
root@server-2:/home/pieter/mft-4.14.4-6-x86_64-deb# mst start
Starting MST (Mellanox Software Tools) driver set
Loading MST PCI module - Success
Loading MST PCI configuration module - Success
Create devices
root@server-2:/home/pieter/mft-4.14.4-6-x86_64-deb# mst status
MST modules:
------------
    MST PCI module loaded
    MST PCI configuration module loaded

MST devices:
------------
/dev/mst/mt4099_pciconf0         - PCI configuration cycles access.
                                   domain:bus:dev.fn=0000:01:00.0 addr.reg=88 data.reg=92 cr_bar.gw_offset=-1
                                   Chip revision is: 01
/dev/mst/mt4099_pci_cr0          - PCI direct access.
                                   domain:bus:dev.fn=0000:01:00.0 bar=0xf7400000 size=0x100000
                                   Chip revision is: 01
Use mlxconfig to change the link mode to Ethernet:
root@server-2:/home/pieter# mlxconfig -d /dev/mst/mt4099_pciconf0 set LINK_TYPE_P1=2 LINK_TYPE_P2=2
...
root@server-2:/home/pieter/mft-4.14.4-6-x86_64-deb# mlxconfig -d /dev/mst/mt4099_pciconf0 query

Device #1:
----------

Device type:    ConnectX3
Device:         /dev/mst/mt4099_pciconf0

Configurations:                              Next Boot
         SRIOV_EN                            True(1)
         NUM_OF_VFS                          8
         LINK_TYPE_P1                        ETH(2)
         LINK_TYPE_P2                        ETH(2)
         LOG_BAR_SIZE                        3
         BOOT_PKEY_P1                        0
         BOOT_PKEY_P2                        0
         BOOT_OPTION_ROM_EN_P1               False(0)
         BOOT_VLAN_EN_P1                     False(0)
         BOOT_RETRY_CNT_P1                   0
         LEGACY_BOOT_PROTOCOL_P1             None(0)
         BOOT_VLAN_P1                        0
         BOOT_OPTION_ROM_EN_P2               False(0)
         BOOT_VLAN_EN_P2                     False(0)
         BOOT_RETRY_CNT_P2                   0
         LEGACY_BOOT_PROTOCOL_P2             None(0)
         BOOT_VLAN_P2                        0
         IP_VER_P1                           IPv4(0)
         IP_VER_P2                           IPv4(0)
         CQ_TIMESTAMP                        True(1)
Reboot the servers and configure the new ethernet adapters with static IP addresses, verify they can ping each other. Use ethtool to verify the link speeds are as expected:
root@server-2:/home/pieter# ethtool eth2
Settings for eth2:
        Supported ports: [ FIBRE ]
        Supported link modes:   1000baseKX/Full
                                10000baseKX4/Full
                                10000baseKR/Full
                                40000baseCR4/Full
                                40000baseSR4/Full
                                56000baseCR4/Full
                                56000baseSR4/Full
        Supported pause frame use: Symmetric Receive-only
        Supports auto-negotiation: Yes
        Supported FEC modes: Not reported
        Advertised link modes:  1000baseKX/Full
                                10000baseKX4/Full
                                10000baseKR/Full
                                40000baseCR4/Full
                                40000baseSR4/Full
        Advertised pause frame use: Symmetric
        Advertised auto-negotiation: Yes
        Advertised FEC modes: Not reported
        Link partner advertised link modes:  40000baseCR4/Full
                                             56000baseCR4/Full
        Link partner advertised pause frame use: No
        Link partner advertised auto-negotiation: Yes
        Link partner advertised FEC modes: Not reported
        Speed: 40000Mb/s
        Duplex: Full
        Port: Direct Attach Copper
        PHYAD: 0
        Transceiver: internal
        Auto-negotiation: on
        Supports Wake-on: d
        Wake-on: d
        Current message level: 0x00000014 (20)
                               link ifdown
        Link detected: yes
The above steps were easy on the PVE server, but Unraid runs Slackware with a custom kernel, and mft requires the kernel headers and a compiler toolchain to be installed, so I booted the Unraid server from an Ubuntu Server on USB stick, and performed the link mode change from Ubuntu. Once the cards are configured, they will continue operating in that mode, and the mft tools are no longer required.
With the links up and running rsyncd through the Mellanox cards the maximum throughput is around 230MBps or 2Gbps, this is far below the 40Gbps link capacity, but as expected the speed is capped by the transfer rate of a single hard drive, still double the speed of gigabit, and half the time to copy the data (ignoring the time required to ship the Mellanox adapters…).
Now that the data was copied to the secondary server, I need to install PVE on the primary server. The server motherboards have USB3 plugs on the motherboard, typically used for boot media. Unraid is designed to boot from a USB stick as it loads into memory and does not use the USB stick for general write operations. PVE can be installed on a USB stick, but treats the USB stick like a normal drive, and this can lead to wear leveling problems. An alternative would be to install PVE on a SSD drive, and PVE supports installation on a ZFS mirror, but I don’t have vanilla SATA and SSD installation options in the SC846 cases. I could enable the boot BIOS in the LSI HBA, and using one or two removable drive bays for the boot SSD’s, but that reduces storage expansion capacity. I chose a simpler alternative, using a USB3 to mSATA adapter, and a 64GB mSATA drive, plugged into the motherboard USB3 adapter. You can find new InnoDisk 3ME2 industrial grade mSATA drives with a USB3 adapter, updated to support TRIM, reasonably priced on eBay.
My test PVE setup installed on a 32GB USB stick, and the default partitioning only allocated 7GB to the root partition, and the rest to data, and I am constantly running out of space on root. Per the Proxmox install wiki the maximum root size is 1/4 the total disk size, I don’t understand why this restriction exists.
Installing on the 64GB mSATA disk, I modified the install options; disk size reported as 59GB, changed the filesystem from EXT4 to XFS, swapsize to 8, minfree to 0, maxvz to 0, I left maxroot blank, and the the installer only created a 14.8GB root partition. I tried again, this time specifying 48 for maxroot. Made no difference, root is still 14.8GB, so it seems the wiki that says maximum root size of 1/4 of the disk is enforced. At least the data volume was not created, and there is enough space left to extend the LVM if ever needed.
root@server-1:~# lsblk
...
sdr 65:16 0 59.6G 0 disk
├─sdr1 65:17 0 1007K 0 part
├─sdr2 65:18 0 512M 0 part /boot/efi
└─sdr3 65:19 0 59.1G 0 part
├─pve-swap 253:0 0 8G 0 lvm [SWAP]
└─pve-root 253:1 0 14.8G 0 lvm /
root@server-1:~# df -h
Filesystem Size Used Avail Use% Mounted on
udev 16G 0 16G 0% /dev
tmpfs 3.2G 9.1M 3.2G 1% /run
/dev/mapper/pve-root 15G 1.9G 13G 13% /
tmpfs 16G 43M 16G 1% /dev/shm
tmpfs 5.0M 0 5.0M 0% /run/lock
tmpfs 16G 0 16G 0% /sys/fs/cgroup
/dev/sdr2 511M 320K 511M 1% /boot/efi
/dev/fuse 30M 16K 30M 1% /etc/pve
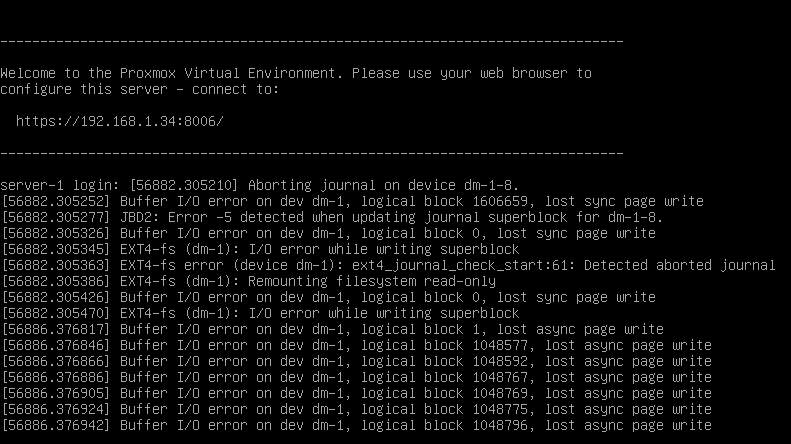
tmpfs 3.2G 0 3.2G 0% /run/user/0Things initially looked good for the USB mSATA option, but by the next morning the server was unresponsive, and the console showed disk corruption. I tried again, this time with EXT4 instead of XFS, and again the next morning the server was unresponsive with disk corruption. The mSATA SMART attributes are normal, so I don’t know if the problem is a bad mSATA drive, a bad USB to mSATA adapter, or something else.

I considered using SATA DOM adapters, DELL branded DOM’s are reasonably cheap on eBay, but the X10SLM+-F boards I use does not have powered SATA ports, and I would have to get SM DOM power cables. Too much hassle, and combined more expensive than a small SSD, so I used a 256GB Samsung 860 Pro SSD instead, and used 3M Command velcro strips to tape the SSD to the inside of the case. with 256GB there is enough space on the SSD, so I reinstalled with default install options, and PVE has been running without issue on the SSD drive.
root@server-1:~# lsblk
NAME               MAJ:MIN RM   SIZE RO TYPE MOUNTPOINT
sda                  8:0    0 238.5G  0 disk
├─sda1               8:1    0  1007K  0 part
├─sda2               8:2    0   512M  0 part /boot/efi
└─sda3               8:3    0   238G  0 part
  ├─pve-swap       253:0    0     8G  0 lvm  [SWAP]
  ├─pve-root       253:1    0  59.3G  0 lvm  /
  ├─pve-data_tmeta 253:2    0   1.6G  0 lvm
  │ └─pve-data     253:4    0 151.6G  0 lvm
  └─pve-data_tdata 253:3    0 151.6G  0 lvm
    └─pve-data     253:4    0 151.6G  0 lvm

root@server-1:~# df -h
Filesystem            Size  Used Avail Use% Mounted on
udev                   16G     0   16G   0% /dev
tmpfs                 3.2G  9.1M  3.2G   1% /run
/dev/mapper/pve-root   59G  1.9G   54G   4% /
tmpfs                  16G   43M   16G   1% /dev/shm
tmpfs                 5.0M     0  5.0M   0% /run/lock
tmpfs                  16G     0   16G   0% /sys/fs/cgroup
/dev/sda2             511M  312K  511M   1% /boot/efi
/dev/fuse              30M   24K   30M   1% /etc/pve
tmpfs                 3.2G     0  3.2G   0% /run/user/0
Following are a few post-installation steps I took:
- Purchase a community support subscription, apply the subscription key, upgrade, reboot if required. Alternatively follow internet instructions on removing the subscription nag, and replacing the PVE enterprise repository with the vanilla Debian repository.
- PVE does ask for an email address at install time, but it tries to use the domain MX record as SMTP server to send email, and unless you are running an open email relay, email sending will probably fail. Reconfigure postfix to match your environment.
dpkg-reconfigure postfix
- Add a SSL certificate for the server, I use wildcard certs, or follow the instructions in the wiki for ACME setup for Let’s Encrypt certificates.
- Install your favorite apps, that are probably not included in the trimmed down base installation. pve-headers is required when building any kernel modules, and ifupdown2 is required when making dynamic network changes.
apt updateapt install mc sudo screen pve-headers ifupdown2
- Add user accounts to the system, then follow the instruction in the wiki to add PAM accounts to the Datacenter. Remember to create a home directory when creating the user, and add the user to the sudo group if desired.
useradd --create-home pieterpasswd pieterusermod -aG sudo pieterusermod --shell /bin/bash pieter
- Add the users to the users group, this is used for permission inheritance. I add nobody and root to users, make sure this is appropriate for your system, as nobody by default only belongs to nogroup.
usermod -aG users pieterusermod -aG users nobodyusermod -aG users root
- Create SSH keys for users, and import trusted SSH authorization keys.
- Login with the desired account.
ssh-keygen -t rsa -b 4096 -C "pieter@server-1"- Copy id_rsa.pub from other systems to this system.
cat ~/id_rsa.pub >> ~/.ssh/authorized_keysrm ~/id_rsa.pub
- Configure the network adapters to suit your needs, follow the wiki for guidance on different setups.
- By default the adapter you selected at install time is bridged and used by PVE.
- My motherboards have two ethernet ports, and I create a second bridge with no IP assignment for use by VM’s and Docker macvlan networks.
- I configured the third bridge for the Mellanox 40Gbps adapter with a static IP to direct-connect to the other server.
- Hold of on installing Docker until after ZFS is configured, then create a ZFS datasets mapping to
/var/lib/dockerso that Docker will use the ZFS filesystem driver.
For my ZFS configuration I chose to use mirror vdev’s, for it allows upgrading storage two disks at a time, but it comes at a cost of 50% space utilization, and protection against only 1 drive failure. There are many opinions on best configurations and actual probability of failures, but the overriding factor for me was the ability to expand storage two disks at a time.
I am not a ZFS expert, so look for ZFS information elsewhere, but I did follow a few ZFS guidelines:
- Use immutable disk identifiers when creating pools.
ls -lh /dev/disk/by-id/
- Use a recordsize for the dataset that matches the content type or IO pattern. The default size is 128KB, and I set the recordsize to 1MB for folders containing mostly large files.
recordsize=1M
- Enable compression.
compression=lz4
- Make sure that ashift is appropriate for the disk sector size. A value of 12 would work for most drives.
ashift=12
- Enable automatic TRIM on SSD pools.
autotrim=on
- Set recommended performance and security attributes.
xattr=sa acltype=posixacl atime=off relatime=off dnodesize=auto
- Remember to specify drive specific property values when adding a vdev to an existing pool, the vdev does not inherit the pool properties.
zpool add -o ashift=12
- Try to mix disks from different manufacturing batches in the same mirror, this minimizes the probability of both disks in the mirror failing simultaneously for the same reason.
I created three pools, one for SSD’s, one for spinning disks, and one for my security camera NVR. Note I set mountpoint=none as I do not want the pools to be mounted, I only want my datasets to be mounted.
zpool create \
    -o ashift=12 -o autotrim=on \
    -O compression=lz4 -O xattr=sa -O acltype=posixacl -O atime=off -O relatime=off -O dnodesize=auto -O mountpoint=none \
    ssdpool \
    mirror \
        ata-Samsung_SSD_860_PRO_1TB_S5HVNE0MA05858T \
        ata-Samsung_SSD_860_PRO_1TB_S5HVNE0MA05857X \
    mirror \
        ata-Samsung_SSD_860_PRO_1TB_S5HVNE0MA05863D \
        ata-Samsung_SSD_860_PRO_1TB_S5HVNE0MA05864L

zpool create -f \
    -o ashift=12 \
    -O compression=lz4 -O xattr=sa -O acltype=posixacl -O atime=off -O relatime=off -O dnodesize=auto -O mountpoint=none \
    hddpool \
    mirror \
        ata-ST12000VN0007-2GS116_ZJV3836W \
        ata-ST12000VN0007-2GS116_ZJV32CEQ \
    mirror \
        ata-ST12000VN0008-2JH101_ZHZ634Q3 \
        ata-ST12000VN0007-2GS116_ZJV2PMAG \
    mirror \
        ata-ST12000VN0008-2JH101_ZHZ5VY6D \
        ata-ST12000VN0007-2GS116_ZJV321CW \
    mirror \
        ata-ST12000VN0008-2PH103_ZLW0CK42 \
        ata-ST12000VN0007-2GS116_ZJV2ZGBS \
    mirror \
        ata-ST12000VN0008-2PH103_ZLW0A3Q5 \
        ata-ST12000VN0007-2GS116_ZJV3AW2Y

zpool create \
    -o ashift=12 -o autotrim=on \
    -O compression=lz4 -O xattr=sa -O acltype=posixacl -O atime=off -O relatime=off -O dnodesize=auto -O mountpoint=none \
    nvrpool \
    mirror \
        ata-Samsung_SSD_850_PRO_1TB_S252NXAGA29071N \
        ata-Samsung_SSD_850_PRO_1TB_S252NXAGA29083V
I created my datasets to mount under /data, and I mounted the Docker dataset under /var/lib/docker. My choice of /data is arbitrary, there are standards, but use whatever you want. I would suggest not using /mnt as it is intended for temporary storage, and do not use /media as it is used to dynamically mount removable storage.
mkdir /data

zfs create -o mountpoint=/data/appdata ssdpool/appdata

zfs create -o mountpoint=/data/media -o recordsize=1M hddpool/media
zfs create -o mountpoint=/data/backup hddpool/backup
zfs create -o mountpoint=/data/install hddpool/install
zfs create -o mountpoint=/data/public hddpool/public

zfs create -o mountpoint=/data/nvr nvrpool/nvr

zfs create -o mountpoint=/var/lib/docker ssdpool/docker
Follow the Docker instructions for installation on Debian using the repository method, this will keep Docker up to date with the rest of the system, remember the post-installation steps to add authorized accounts to the docker group.
Install Docker-Compose using PIP.
apt install python3 python3-pip
pip3 install docker-compose
Install and configure Samba to your liking, I prefer to disable NetBIOS, printers, and the master browser, none are required for modern SMB. To simplify access permissions, you may want to force access to use a specific user account. This is useful when using nobody:users for Docker mounts and accessing the same files over SMB.
A snippet of my smb.conf file:
[global]
   disable netbios = yes
   load printers = no
   printing = bsd
   printcap name = /dev/null
   disable spoolss = yes
   local master = no
   log file = /var/log/samba/log.%m
   max log size = 1000
   logging = file
   panic action = /usr/share/samba/panic-action %d
   server role = standalone server
   obey pam restrictions = yes
   unix password sync = yes
   passwd program = /usr/bin/passwd %u
   passwd chat = *Enter\snew\s*\spassword:* %n\n *Retype\snew\s*\spassword:* %n\n *password\supdated\ssuccessfully* .
   pam password change = yes
   map to guest = bad user

[Public]
   comment = Public
   path = /data/public
   writeable = yes
   public = yes
   force user = nobody
   create mask = 0675
   directory mask = 0775

[Media]
   comment = Media
   path = /data/media
   write list = pieter
   valid users = pieter
   create mask = 0675
   directory mask = 0775
Now that the primary server was up and running, it was time to copy all the data back from the secondary server. I considered installing rsyncd again, but with the Mellanox 40Gbps cards I maxed out the drive speed running rsync over SSH, so no need for rsyncd. Copying from PVE ZFS to PVE ZFS was significantly faster (430MBps) compared to copying from Unraid (230MBps), this could be due to superior ZFS write performance, or the Unraid filesystem performance issues.

Now that all the data was back, I had to fix the file and directory permissions. I use the appdata dataset mounted at /data/appdata for all the docker /config mounts, and the file permissions have to match those of the account used in the container. When using LinuxServer (LSIO) containers, the PUID and PGID environment variables are used to map the user account. I find it convenient to use nobody:users for permissions and for running LSIO containers using nobody for PUID/PGID, get the actual numeric values using id nobody.
chown -R nobody:users /data/appdata
chmod -R u=rwx,g=rwx,o=rx /data/appdata
sudo chmod g+s /data/appdata
As I mentioned, I store my configuration files on a private GitHub repository, and I use VSCode for general authoring. In order for VSCode Remote Development to work, make sure the local system can connect to the server using SSH keys, and that the server account can access GitHub over SSH. A detailed rundown on how to use VSCode, Docker, Ansible, and setup all the containers is beyond the scope of this article, but I’ll show how to get Portainer, Postfix, and Watchtower configured.
portainer.yml:
version: '3.7'

services:
  portainer:
    image: portainer/portainer
    command: -H unix:///var/run/docker.sock
    container_name: portainer
    hostname: portainer
    domainname: home.insanegenius.net
    restart: unless-stopped
    environment:
      - TZ=America/Los_Angeles
    volumes:
      - /var/run/docker.sock:/var/run/docker.sock
      - portainer_data:/data
    network_mode: bridge
    ports:
      - 9000:9000

volumes:
  portainer_data:
pieter@server-1:~/HomeAutomation/Docker$ docker-compose --file portainer.yml up --detach
Creating volume "docker_portainer_data" with default driver
Pulling portainer (portainer/portainer:)...
latest: Pulling from portainer/portainer
d1e017099d17: Pull complete
b8084bf83dcf: Pull complete
Digest: sha256:55c7614b1ad61eabc27214299c42d41bb49e5ef78238c0e5783031f041499284
Status: Downloaded newer image for portainer/portainer:latest
Creating portainer ... donewatchtower.yml:
version: '3.7'

services:
  watchtower:
    image: containrrr/watchtower
    container_name: watchtower
    hostname: watchtower
    domainname: home.insanegenius.net
    restart: unless-stopped
    environment:
      - TZ=America/Los_Angeles
      - WATCHTOWER_NOTIFICATIONS=email
      - WATCHTOWER_NOTIFICATION_EMAIL_FROM=secret
      - WATCHTOWER_NOTIFICATION_EMAIL_TO=secret
      - WATCHTOWER_NOTIFICATION_EMAIL_SERVER=smtp.home.insanegenius.net
      - WATCHTOWER_NOTIFICATION_EMAIL_SERVER_PORT=25
      - WATCHTOWER_NOTIFICATION_EMAIL_DELAY=2
      - WATCHTOWER_NOTIFICATION_EMAIL_SUBJECTTAG=Watchtower
      - WATCHTOWER_CLEANUP=true
      - WATCHTOWER_INCLUDE_STOPPED=true
      - WATCHTOWER_TIMEOUT=60
      - WATCHTOWER_SCHEDULE=0 0 2 * * *
    volumes:
      - /var/run/docker.sock:/var/run/docker.sock
    network_mode: host
pieter@server-1:~/HomeAutomation/Docker$ docker-compose --file watchtower.yml up --detach
WARNING: Found orphan containers (portainer) for this project. If you removed or renamed this service in your compose file, you can run this command with the --remove-orphans flag to clean it up.
Pulling watchtower (containrrr/watchtower:)...
latest: Pulling from containrrr/watchtower
e42677bd61ba: Pull complete
f6f75156942d: Pull complete
7d65721eea54: Pull complete
Digest: sha256:b26dfbdda14acac2b5cc862691a0e8248f510a1671532b55dabb2a5231126800
Status: Downloaded newer image for containrrr/watchtower:latest
Creating watchtower ... doneFor Postfix I am going to use a macvlan network so that the container is bound to a dedicated network adapter, and use a static IP. I use Postfix as an anonymous SMTP relay to gmail, this allows all the other services in my home lab to simply send anonymous email to the relay, and the relay is configured with credentials to send email via a Google Apps account.
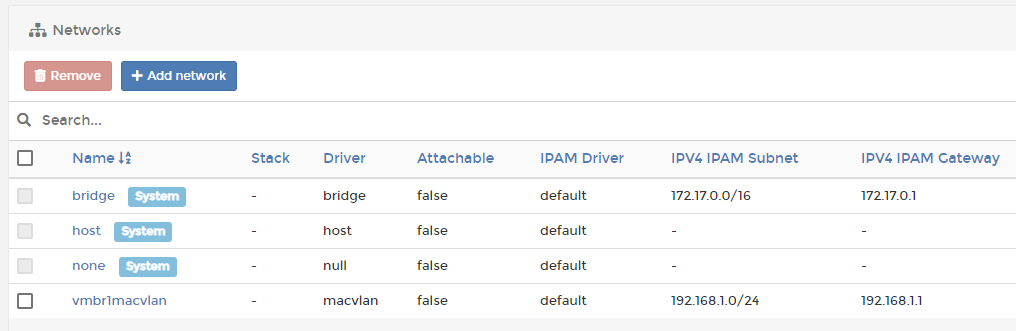
Start by creating the macvlan network, set the parent to the bridge created for the dedicated adapter.

docker network create --driver macvlan --subnet=192.168.1.0/24 --gateway=192.168.1.1 --opt parent=vmbr1 vmbr1macvlanYou can use Portainer or a compose file to create the macvlan network, I just find it easier to create it using the Docker CLI, and then treat it as an external network.
postfix.yml:
version: '3.7'

services:
  postfix:
    image: juanluisbaptiste/postfix
    container_name: postfix
    hostname: smtp
    domainname: home.insanegenius.net
    restart: unless-stopped
    environment:
      - TZ=America/Los_Angeles
      - SMTP_SERVER=smtp.gmail.com
      - SMTP_USERNAME=secret
      - SMTP_PASSWORD=secret
      - SERVER_HOSTNAME=smtp.home.insanegenius.net
    networks:
      postfix_network:
        ipv4_address: 192.168.1.9

networks:
  postfix_network:
    external:
      name: vmbr1macvlan
pieter@server-1:~/HomeAutomation/Docker$ docker-compose --file postfix.yml up --detach
WARNING: Found orphan containers (portainer, watchtower) for this project. If you removed or renamed this service in your compose file, you can run this command with the --remove-orphans flag to clean it up.
Pulling postfix (juanluisbaptiste/postfix:)...
latest: Pulling from juanluisbaptiste/postfix
524b0c1e57f8: Pull complete
22ddd212bef9: Pull complete
4c4da6a944b7: Pull complete
ab4c8c3a8959: Pull complete
980d8149bd2d: Pull complete
9070d2e98791: Pull complete
4f65a7210fa7: Pull complete
1a18e906238f: Pull complete
Digest: sha256:d65733bde3096ab964a0da2e73688f6f0aba47d060cb20ecd7a56ac7c3e37dc2
Status: Downloaded newer image for juanluisbaptiste/postfix:latest
Creating postfix ... doneIt took longer than I expected, but I learned a few things along the way, and I now have a 40Gbps interconnect between my servers.
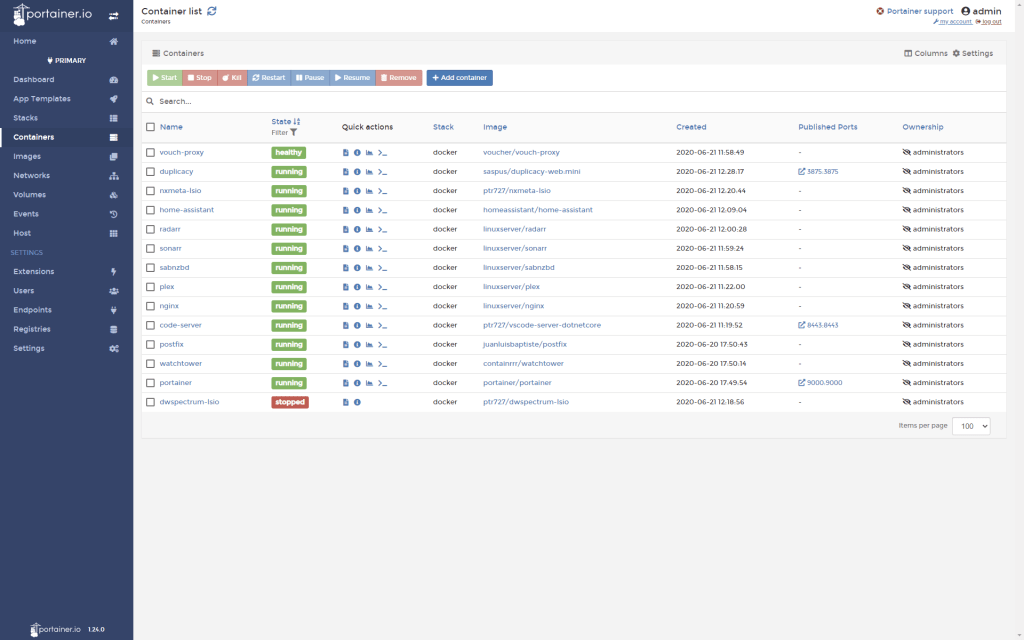
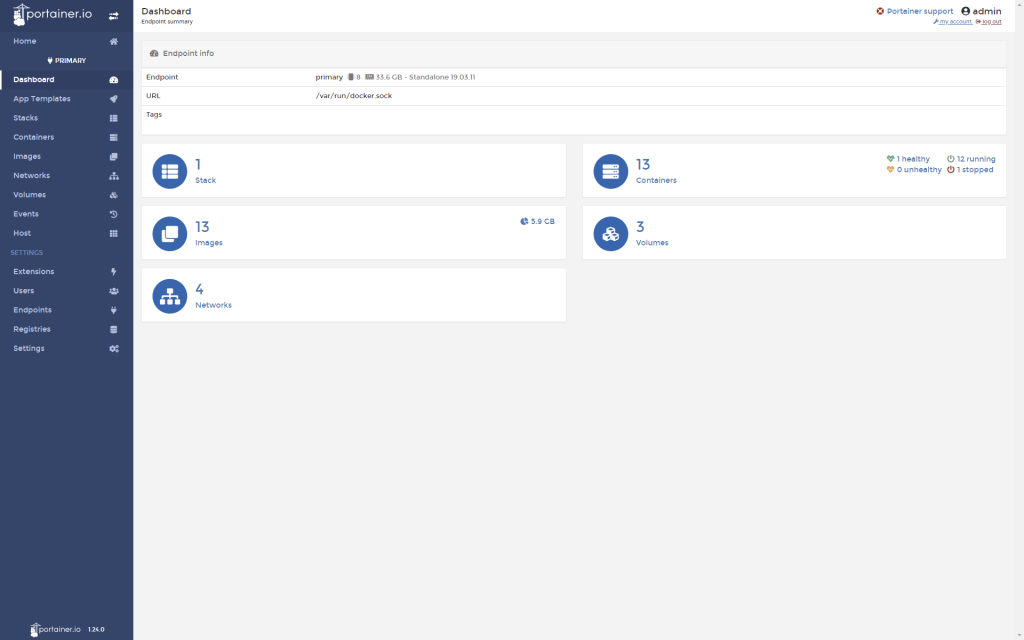
Everything is up and running, but I am going to keep the backup data on the secondary for a few weeks, just in case.
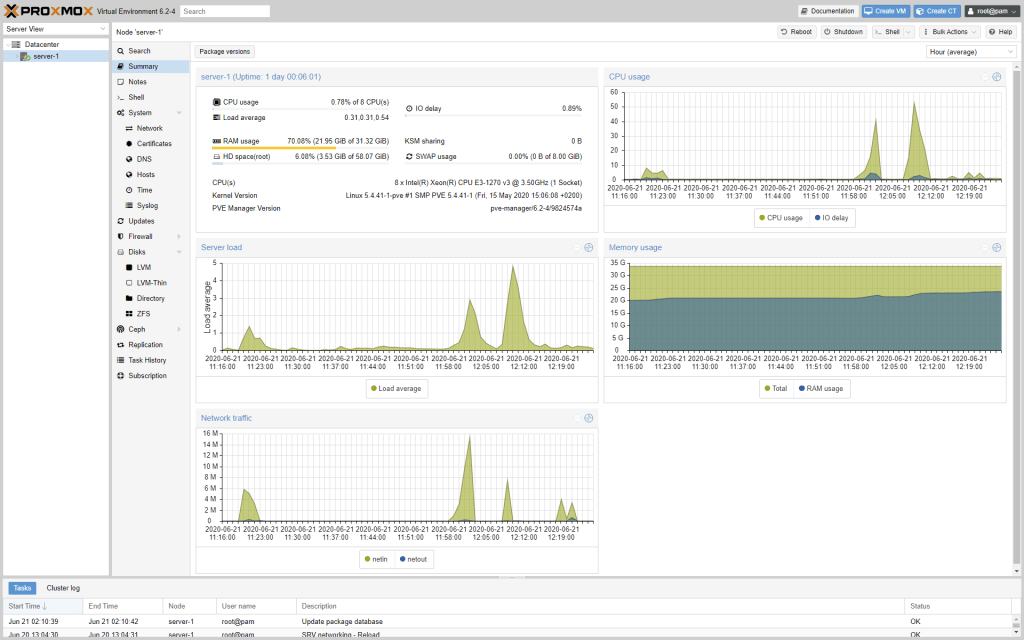
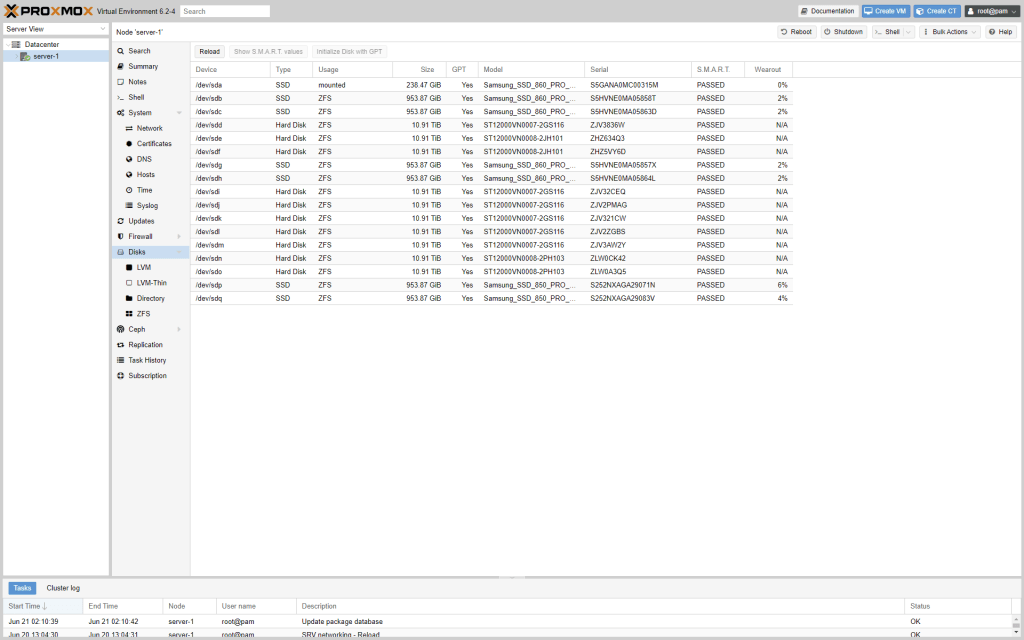
Here are a few screenshot of the end result:


First, thank you for writing such a detailed blog post! I started using Proxmox VE around the same time as you (summer this year), but unlike you, it was my first experience using a hypervisor. I am planning out a larger and upgraded system compared to my current setup, and had been looking at alternatives to Proxmox. I landed on your site after looking for comparative experiences of Unraid and Proxmox. Based on your blog post and others, Proxmox sounds like the better fit for me – I’m already using Ansible for a lot of automation, and am more interested in the ability to get my hands dirty than a pretty UI.
However, I did have one question for you. At the moment, I have a small number of VMs running – mainly for whole-OS applications like OPNsense. I also have one that runs all my Docker containers, rather than running directly on the Proxmox host. My plan was to do a similar thing on a larger (only slightly – two physical servers instead of one) system, and host ~6 VMs to run all my Docker containers, grouped logically so less important apps don’t take down critical infrastructure if there’s an issue, and to allow migration between hypervisor hosts.
Why did you choose to run the Docker containers directly on your Proxmox host, rather than putting them inside a VM? It’s not something I had considered, and the lower overhead (vs a VM) is tempting. But my inclination (again, I’m very new to this whole area) is to keep the hypervisor host as clean as possible, and put all configuration / customization into VMs which can be snapshotted, backed up, migrated, etc.
Would love to hear your thoughts to help me learn more, and thanks again for this blog post – I’ve already checked out several other posts and love your approach to each topic.
LikeLike
Why not docker in a VM, I did cover that: “For me the deciding factor was ZFS; if I install in a LXC or VM I cannot utilize the underlying ZFS capabilities, while if I install on the host, I get all the capabilities of ZFS, most notably datasets, snapshots and quotas.”
LikeLike
In regards to this, you can and should be able to if your drives are passed through as entire disks properly to the VM. I’m not sure if a direct disk passthrough would work, but a PCI card such as a Dell H310 6Gbps SAS HBA (LSI 9211-8i), flashed to IT mode, will work. I have one, and two sets of SAS to SATA cables, and can connect eight disks directly into the Ubuntu VM running in the Proxmox host tower.
Additionally, I used ZFS only for my critical data in a mirrored configuration with two of the eight disks with the other 6 being a 5 JBOD + 1 parity with Snapraid, and then put all seven data disks in a mergerfs shared mount with precreated folders – forcing media to live on JBOD but critical data to live on ZFS using an existing path policy (empfs) of mergerfs.
I believe Alex K. at perfectmediaserver.com (and also https://selfhosted.show/, previously on the LSIO team) dives into this exact methodology.
LikeLike
Fantastic article thank you. I am UNRAID user and have been for many years and like you, some issues still remain that’s prompting me to look elsewhere for similar feature set.
I had a play with Ubuntu 20.10 with latest 5.10.x mainline kernel and I’m liking it so far. Thunderbolt 3 support works especially well unlike UNRAID. I would like to try Proxmox VE but it’s stuck on an old kernel that doesn’t support my Z490 motherboard too well. For me, it’s UNRAID vs PVE vs Ubuntu – not sure which one to stick with.
LikeLike
Amazing article. Thanks for the help as I explore options. Small typo at “using a SATA3 to mSATA adapter” – I think you meant to type “using a USB3 to mSATA adapter”
LikeLike
Yes, thank you for pointing that out, will correct.
LikeLike
How is it that the HOST OS is Ubuntu? Doesn’t Proxmox run on top of Debian already? I may have missed something, but I am curious no the less.
LikeLike
I mentioned Ubuntu as OS in several places, but not as anything to do with Proxmox?
LikeLike
Thank you, Pieter, for the response. I have read the article a few more times and understood that when you state “Debian host.” you mean the host OS of Proxmox. At first, I understood that you were using both Ubuntu and proxmox(Debian) on the same host somehow. What was done is the Debian base was molded to your preference with some modifications to get Docker installed. I assume the Proxmox UI will not manage the docker containers and will only manage the LXC containers, e.g. the Portainer instance for container management.
LikeLike
Nice thorough article I’ll be referring back to at some point when things go wrong. I like the fact you’ve included solutions to problems you had and reasons for decisions. I’m in the process of design at the mo… evaluating best approach for a video editing setup for myself, wife and intern/apprentice. Proxmox looks most likely choice as it allows me to put ZFS on in different pools (fastEdit SSDs mirrored, vs slower big HDD RaidZ for raw material and archived final content, and a 3rd for important docs in smaller block sizes). Plus have a VM for remote rendering with da Vinci resolve.
FreeNAS looks ok a a pure store, and unraid if you just want VMs, but PVE seems to cover all my needs and allows us to grow.
Question how long did it take you to get competent with Ansible. I came across it in my last job as a dev ops QA where we were building Azure build/release pipelines to create test envs (I normally test databases) and say I’m about level 1/10 currently. I can work out what it’s doing, but dont know how to create stuff from scratch.
LikeLike
Unraid has just terrible performance for VMs, or even for multi user NAS type scenarios. See my comment below for how it handles IO to understand why.
LikeLike
Good write up and good for you for getting away from Unraid. Its performance is limited the way it is because of the way it works, it’s super inefficient on IO and is murder on drives during writes. Any given file is written to a single drive but every other drive is still involved. Parity is calculated based on the block number of each disk. So writes to a file on a single drive, require reading the same blocks from every other data drive, calculating the parity of the new data with the data from all the other drives and then writing that to the parity drive.
When a read happens for any given file, the data is only on one drive. So for reading any given file, you only get the read performance of that one drive where that file lives.
I try to steer anyone clear of Unraid that can afford the drives necessary to use any other storage system.
LikeLike