
Every year on the hottest days and coldest nights, with the HVAC on, our bedrooms are either too hot or too cold, and I installed FLAIR Smart Vents to try and remedy the situation. In this post I am sharing my experience with the FLAIR installation and configuration, and my opinions and mini review of the Flair vents.
Background
First some history and background, skip to the installation or conclusion section for TL;DR.
By the time we started building our house, now about 10 years ago, I’d watched countless hours of home build shows on television and YouTube, and I was very much aware of green home technology, proper insulation, air tightness, venting, and zoned HVAC. But, unlike the extreme climates often featured in build shows, we live in a very moderate climate, where only newer homes have AC. To help keep the build budget in check, the builder and architect convinced me that it was not worth the cost to install a multi-zone HVAC system, or what they called “excessive” insulation, not even return air ducts. Even the city inspector looked at me funny when I asked about external heat loss or air tightness testing. We ended up following local code for insulation, and installed two central HVAC units, one for upstairs and one for downstairs.
Problem
Over the of twenty or so years I’ve lived in this area, the number of very hot days have steadily increased, notably so the last few years, and this summer we broke the record for hottest day ever recorded. The impact can be seen in the summer months with many HVAC company trucks around the neighborhood adding cooling to heating only forced air systems, or installing inverter split units.
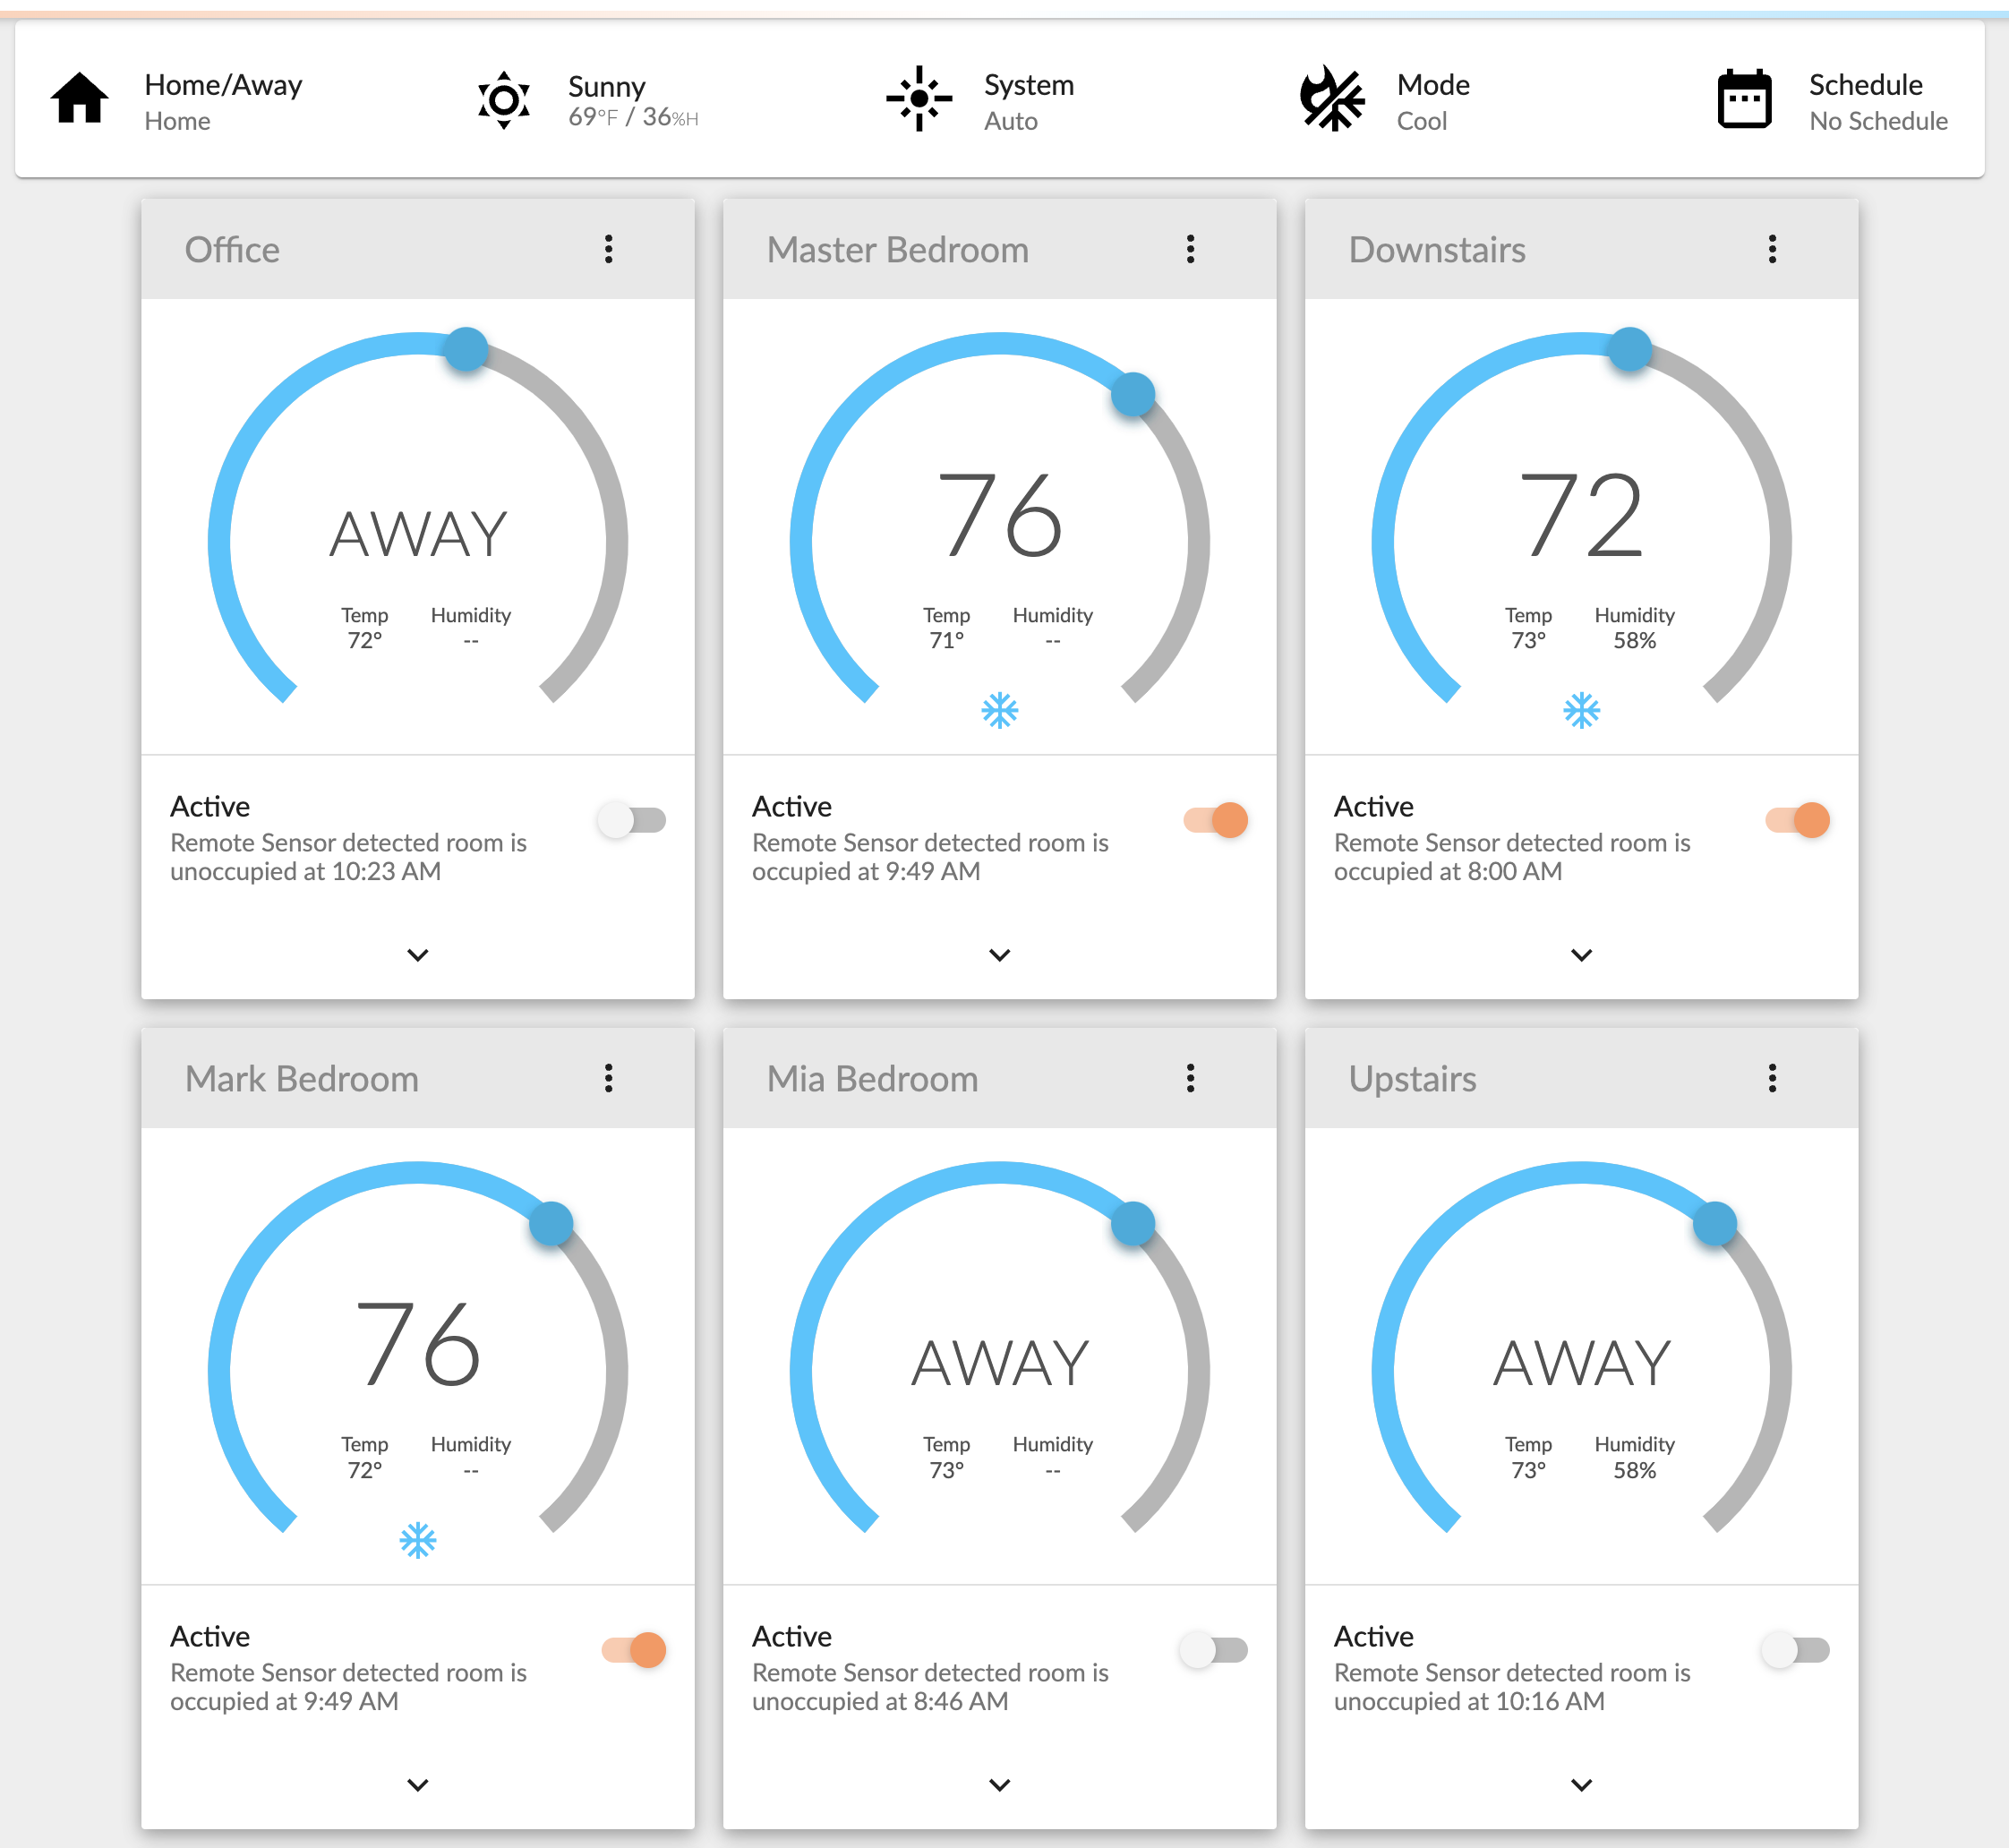
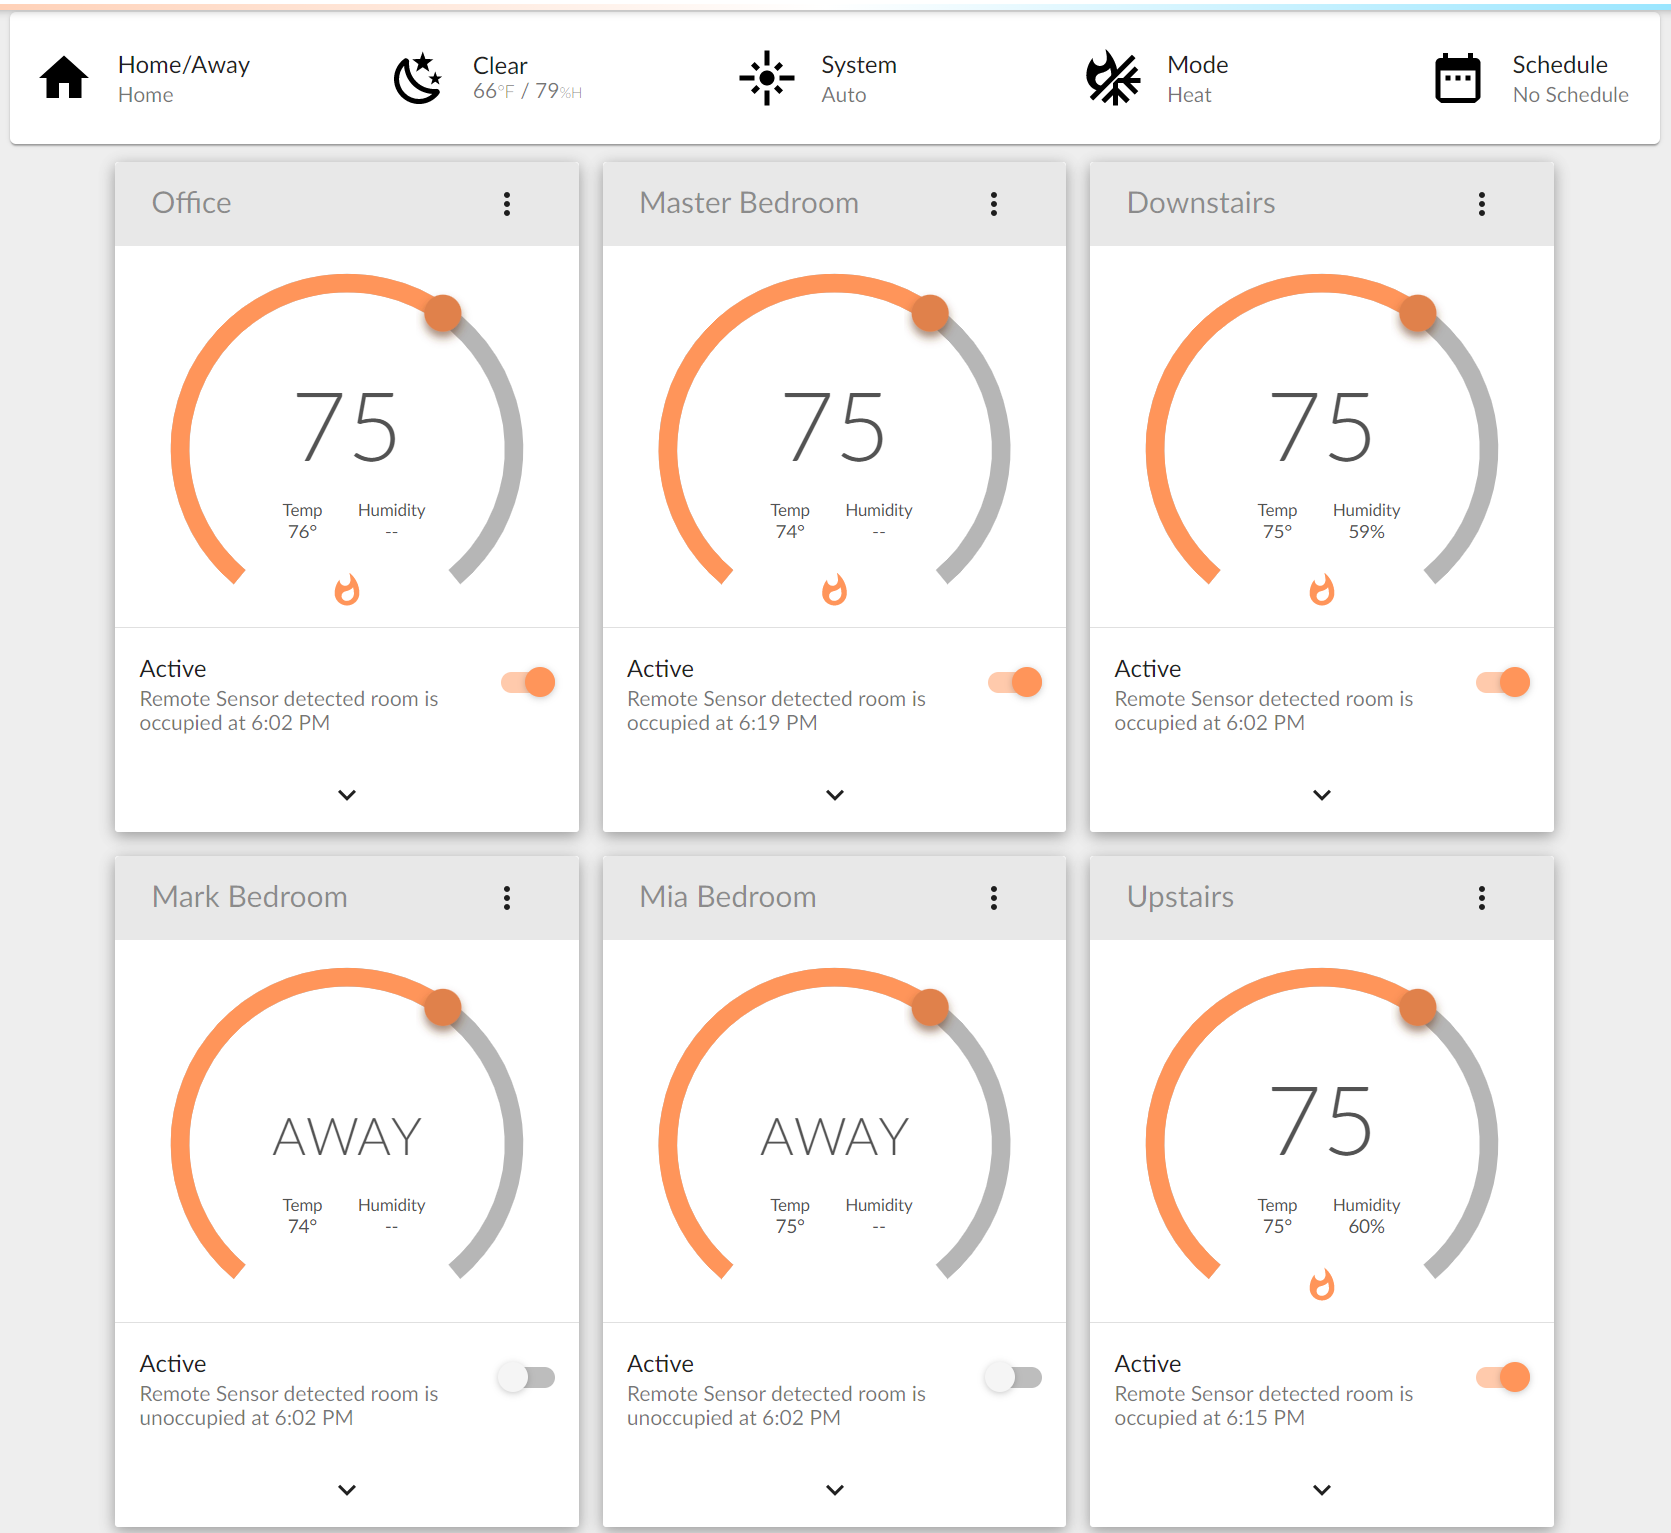
Our bedrooms are upstairs, with an open staircase and skylights, so always much hotter than downstairs, and located on different sides of the house, so sun and shade, and one over the garage so impacted by hot cars and unconditioned space. Most of the year this is not an issue with mild temperatures, but when it does get cold, or hot like this record breaking summer, it is common to experience very large temperature differences between rooms, and this is a problem for a single zone HVAC system.
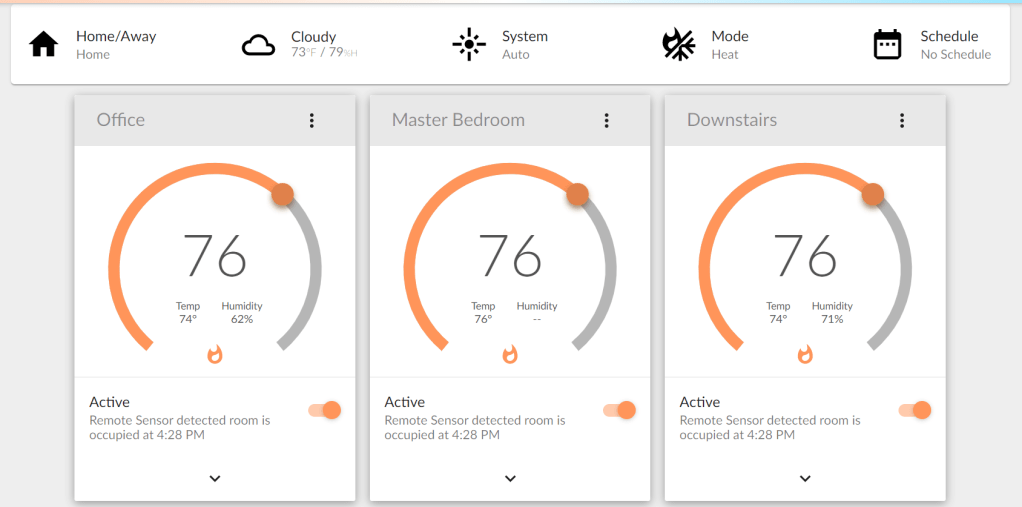
I installed Ecobee thermostats because of their remote sensors, but even with a sensor in every bedroom, and configured Comfort Settings, the sensed setpoint temperature is just the average of all the configured sensors, and the individual room temperatures are still either too hot or too cold.
In recent summers, did I mention it was the hottest summer on record this year, I really do regret not installing a multi-zone system.
Multi-zone Split System
Over the last few years I’ve noticed an increase in mainstream availability of variable speed inverter systems (popular and cheap in Asia and Africa). With Mitsubishi and Daikin split unit systems being advertised and locally supported. Daikin in the US seems to be more commercially focused, while the Trane and Mitsubishi relationship is pushing Mitsubishi in the residential space.
In talking to vendors, I’m told a big drive in California is the energy efficiency requirements, that are making it more difficult for non-variable speed units to achieve the required energy efficiency ratings, and with the push to phase out the use of natural gas in new construction, making the inverter heat pump systems ideal for both heating and cooling.
This year I actually scheduled home visits from two Mitsubishi Diamond Contractors. Both were very professional, knowledgeable, and very detailed in their quotes. Both vendors suggested reusing some of the existing ducting to service common areas, and only installing dedicated units for the bedrooms, office, game room, etc.
I anticipated the cost being “not cheap”; all new equipment, Covid premiums, new line sets (inverter needs supply and return lines insulated), new electrical (I have 30A per compressor they need 50A), ceiling recessed units (no wall warts), drywall opened, ceilings opened, ducting, venting, condensate drainage, labor, labor, and labor. But, I was not quite prepared for just how $$$ expensive, and I decided to evaluate some of the less optimal but cheaper alternatives.
I am not completely foregoing the idea of a complete retrofit, but maybe not by itself, but as part of a larger renovation that justifies the cost of the finishing work (finish carpentry, drywall, and painting not included in quotes). And to be clear, if I were to build a new house today, I would not hesitate to install a multi-zone split unit variable speed inverter system. The immediate comfort and long term energy savings would absolutely be worth it, and installing it as part of a new construction shares much of the cost that has to be double paid when retrofitting.
Smart Vents
I was back to dealing with my existing system and how to add zoning. I eliminated the option of a damper system as it would require construction to install a bypass, dampers, and variable speed blower, quickly getting to multi-zone effort if not pricing. So I took another look at individually controlled vents, something I’ve seen in the startup space, but mostly ignored due to not wanting to invest in unproven technology.
I looked at three vendors; FLAIR, Keen, and Ecovent. From what I can tell Keen acquired Ecovent, so that leaves two vendors and three products. Ecovent does not publish any pricing, and it seems they cater to contractors only. Neither Keen nor Ecovent had good reviews, that left Flair, and since Flair is now available at Home Depot and Lowes, and they got Series-A funding in September, I considered the risk of them disappearing overnight low.
Installation
To get started, I ordered a puck and a couple vents, with the intention of trying them out, and either returning in the 30 day return window, or buying more vents.
The look and feel of the Puck was a bit disappointing for the price, small non-touch monochrome display, and uneven feeling push to actuate action. The Flair Puck is about $119 while an Ecobee3 Lite is about $149, and the Ecobee has a nice big color touch screen. Granted, the puck is about half the size of the Ecobee so more discreet, and I’m not planning on using the puck for anything other than an internet gateway, so look and feel was not that important to me.


I installed the iOS app, set the puck in gateway only mode, followed the installation steps in the app, including creating an account, connecting the puck to WiFi, and connecting Flair to Ecobee for access to my thermostats. I installed batteries in a vent, without installing the actual vent but observing its behavior, and added the vent to Flair using the iOS app by entering pairing mode, no problems.
When I completed the required setup steps I logged into the web portal on my PC to explore, and I was confused to see that the system appeared to be in heating mode. I verified that Ecobee was still in cooling mode, and I changed the Flair mode from Heat to Manual.

I created a post in the Flair community forum asking for help, next day a support ticket was logged for me by a moderator, and it took another four days for support to respond. A five day turnaround for support is not very responsive.
By the time support responded, I had already found my way around the KB articles, and a specific article that explains the Set Point Controller modes. In short, either Ecobee or Flair can be in control of the HVAC operation, but Flair always controls vents.
I either didn’t pay attention during the iOS onboarding steps, or I wasn’t asked to select a controller, or the Flair UI was not in sync with the system. I did noticed the UI state would sometimes randomly change between heat and cool, weird. Either way, an important configuration step that I missed.
Vents
Next up was replacing a few of my vents with Flair vents, and I started in my office where I could keep an eye on the vent. I thought the install would be easy, remove old vent, install new vent, done, but it turns out it is much more effort than anticipated.
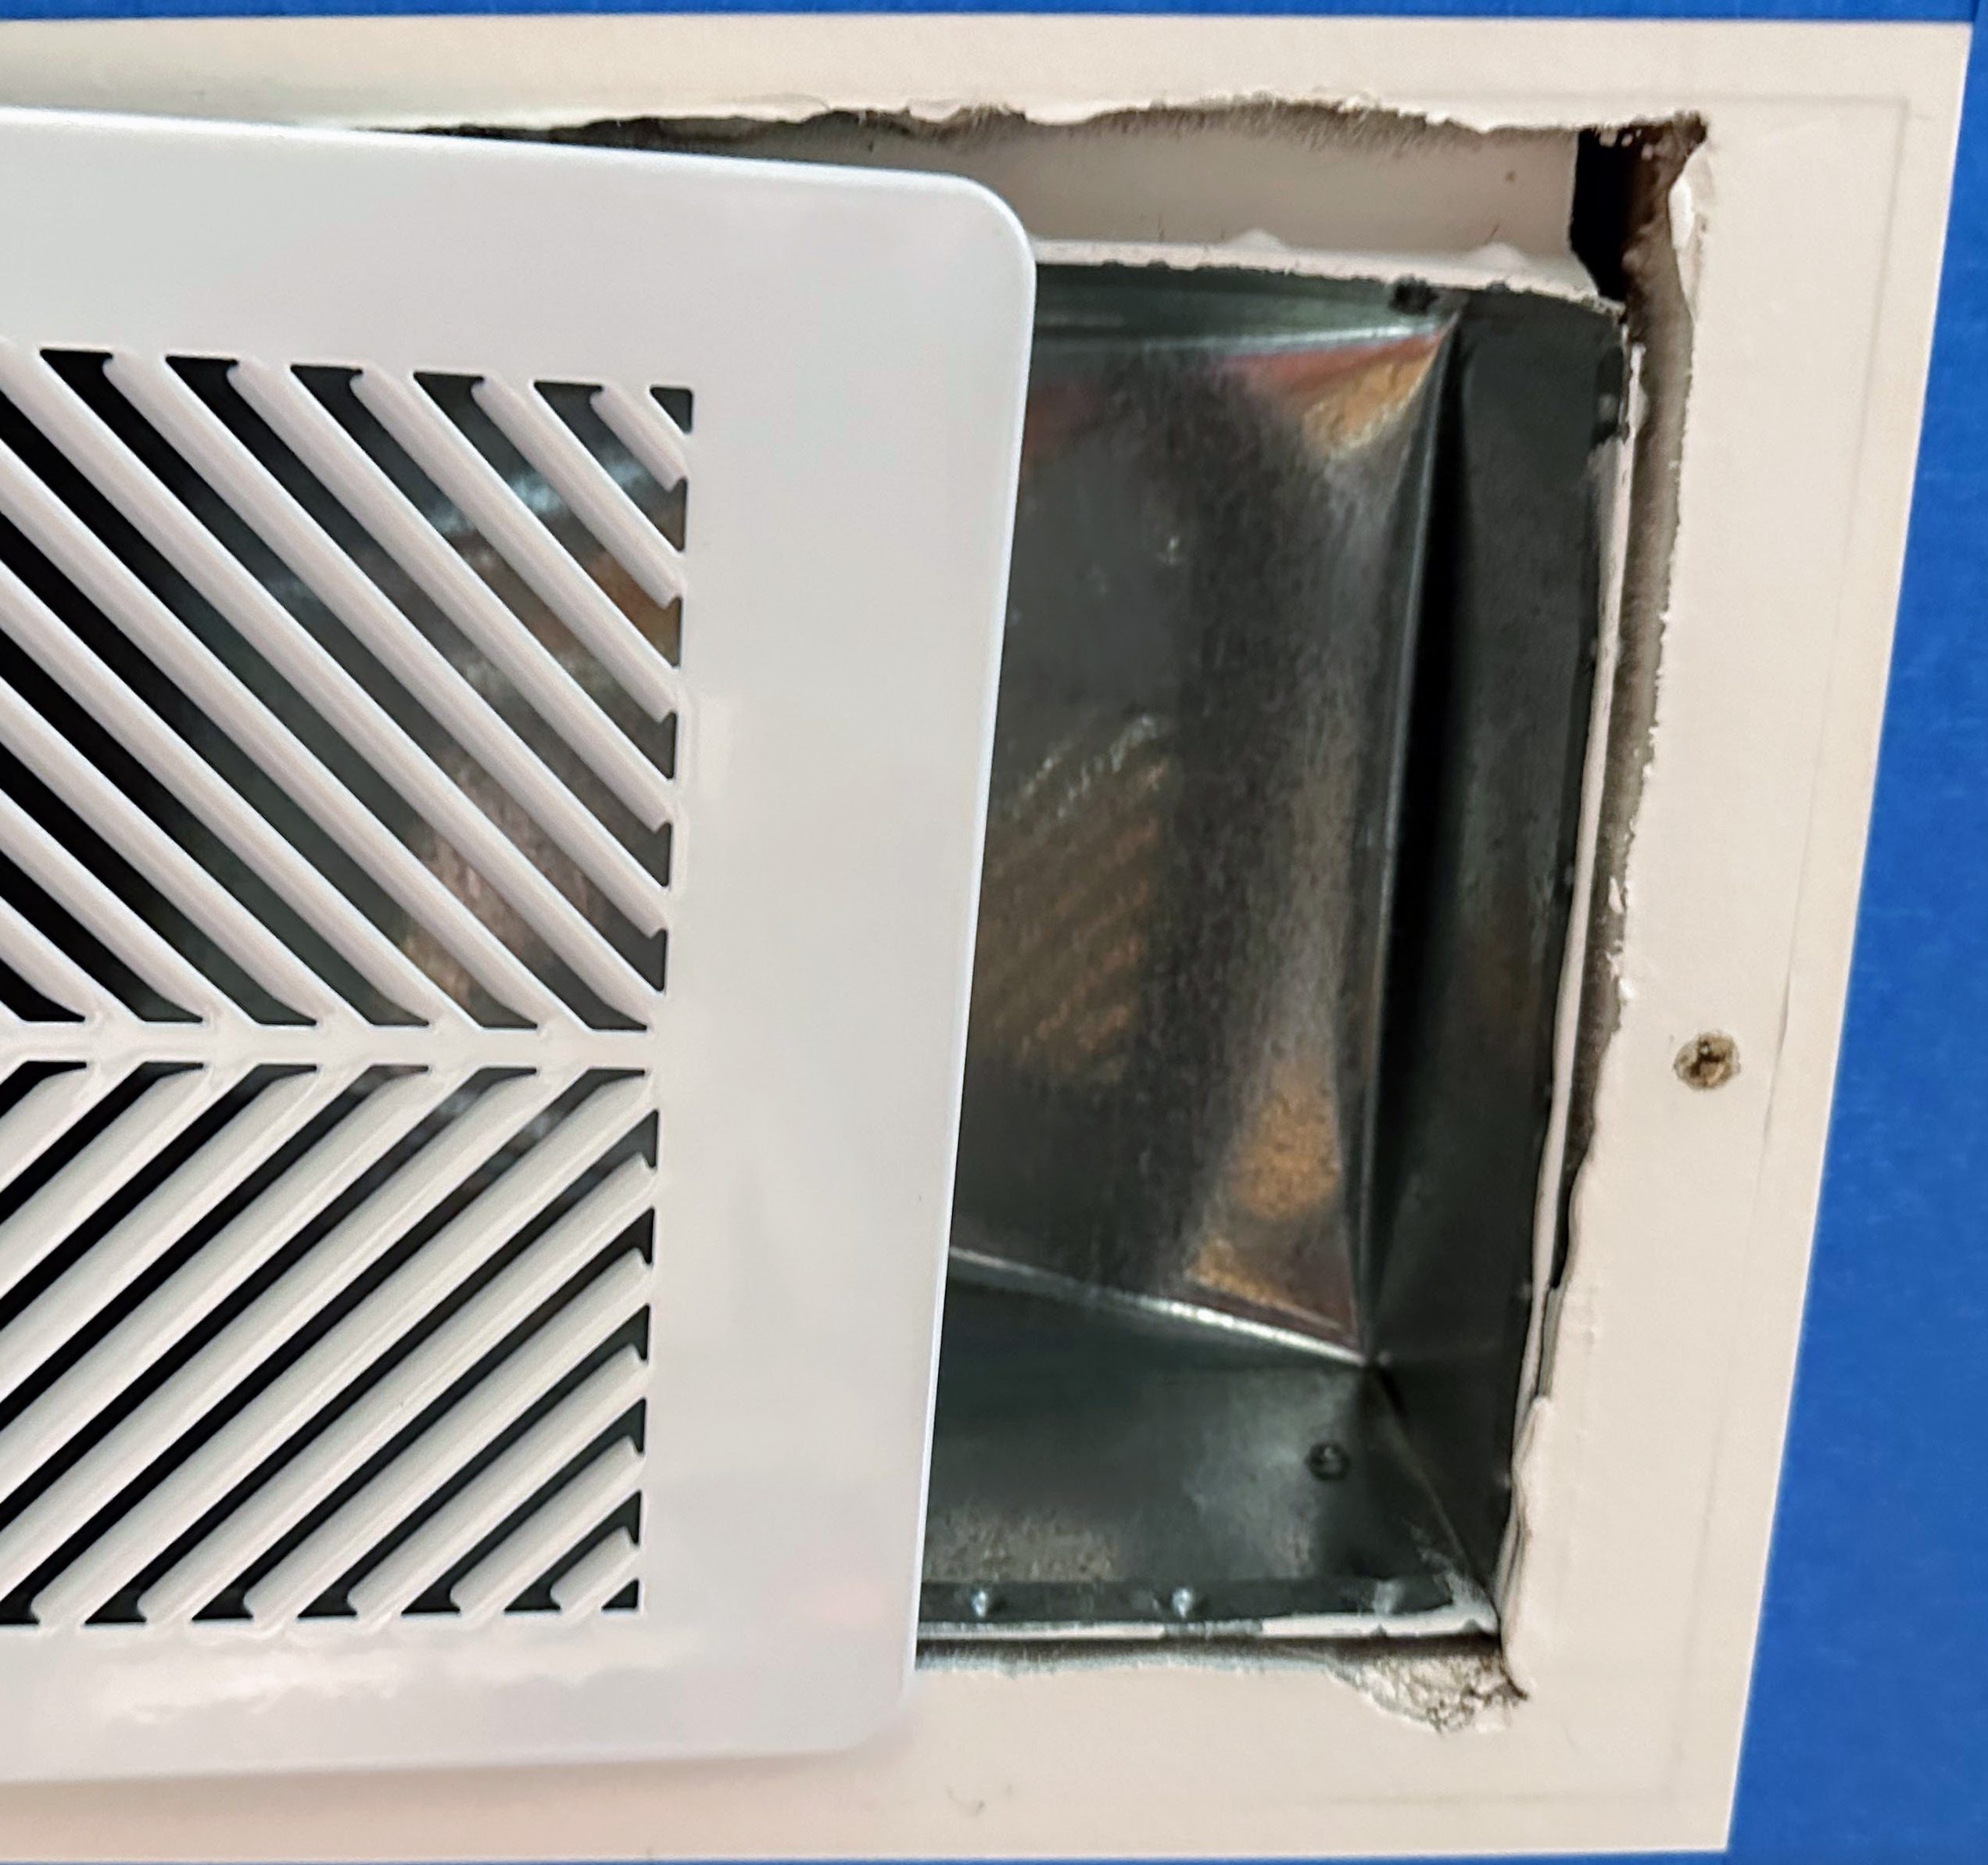
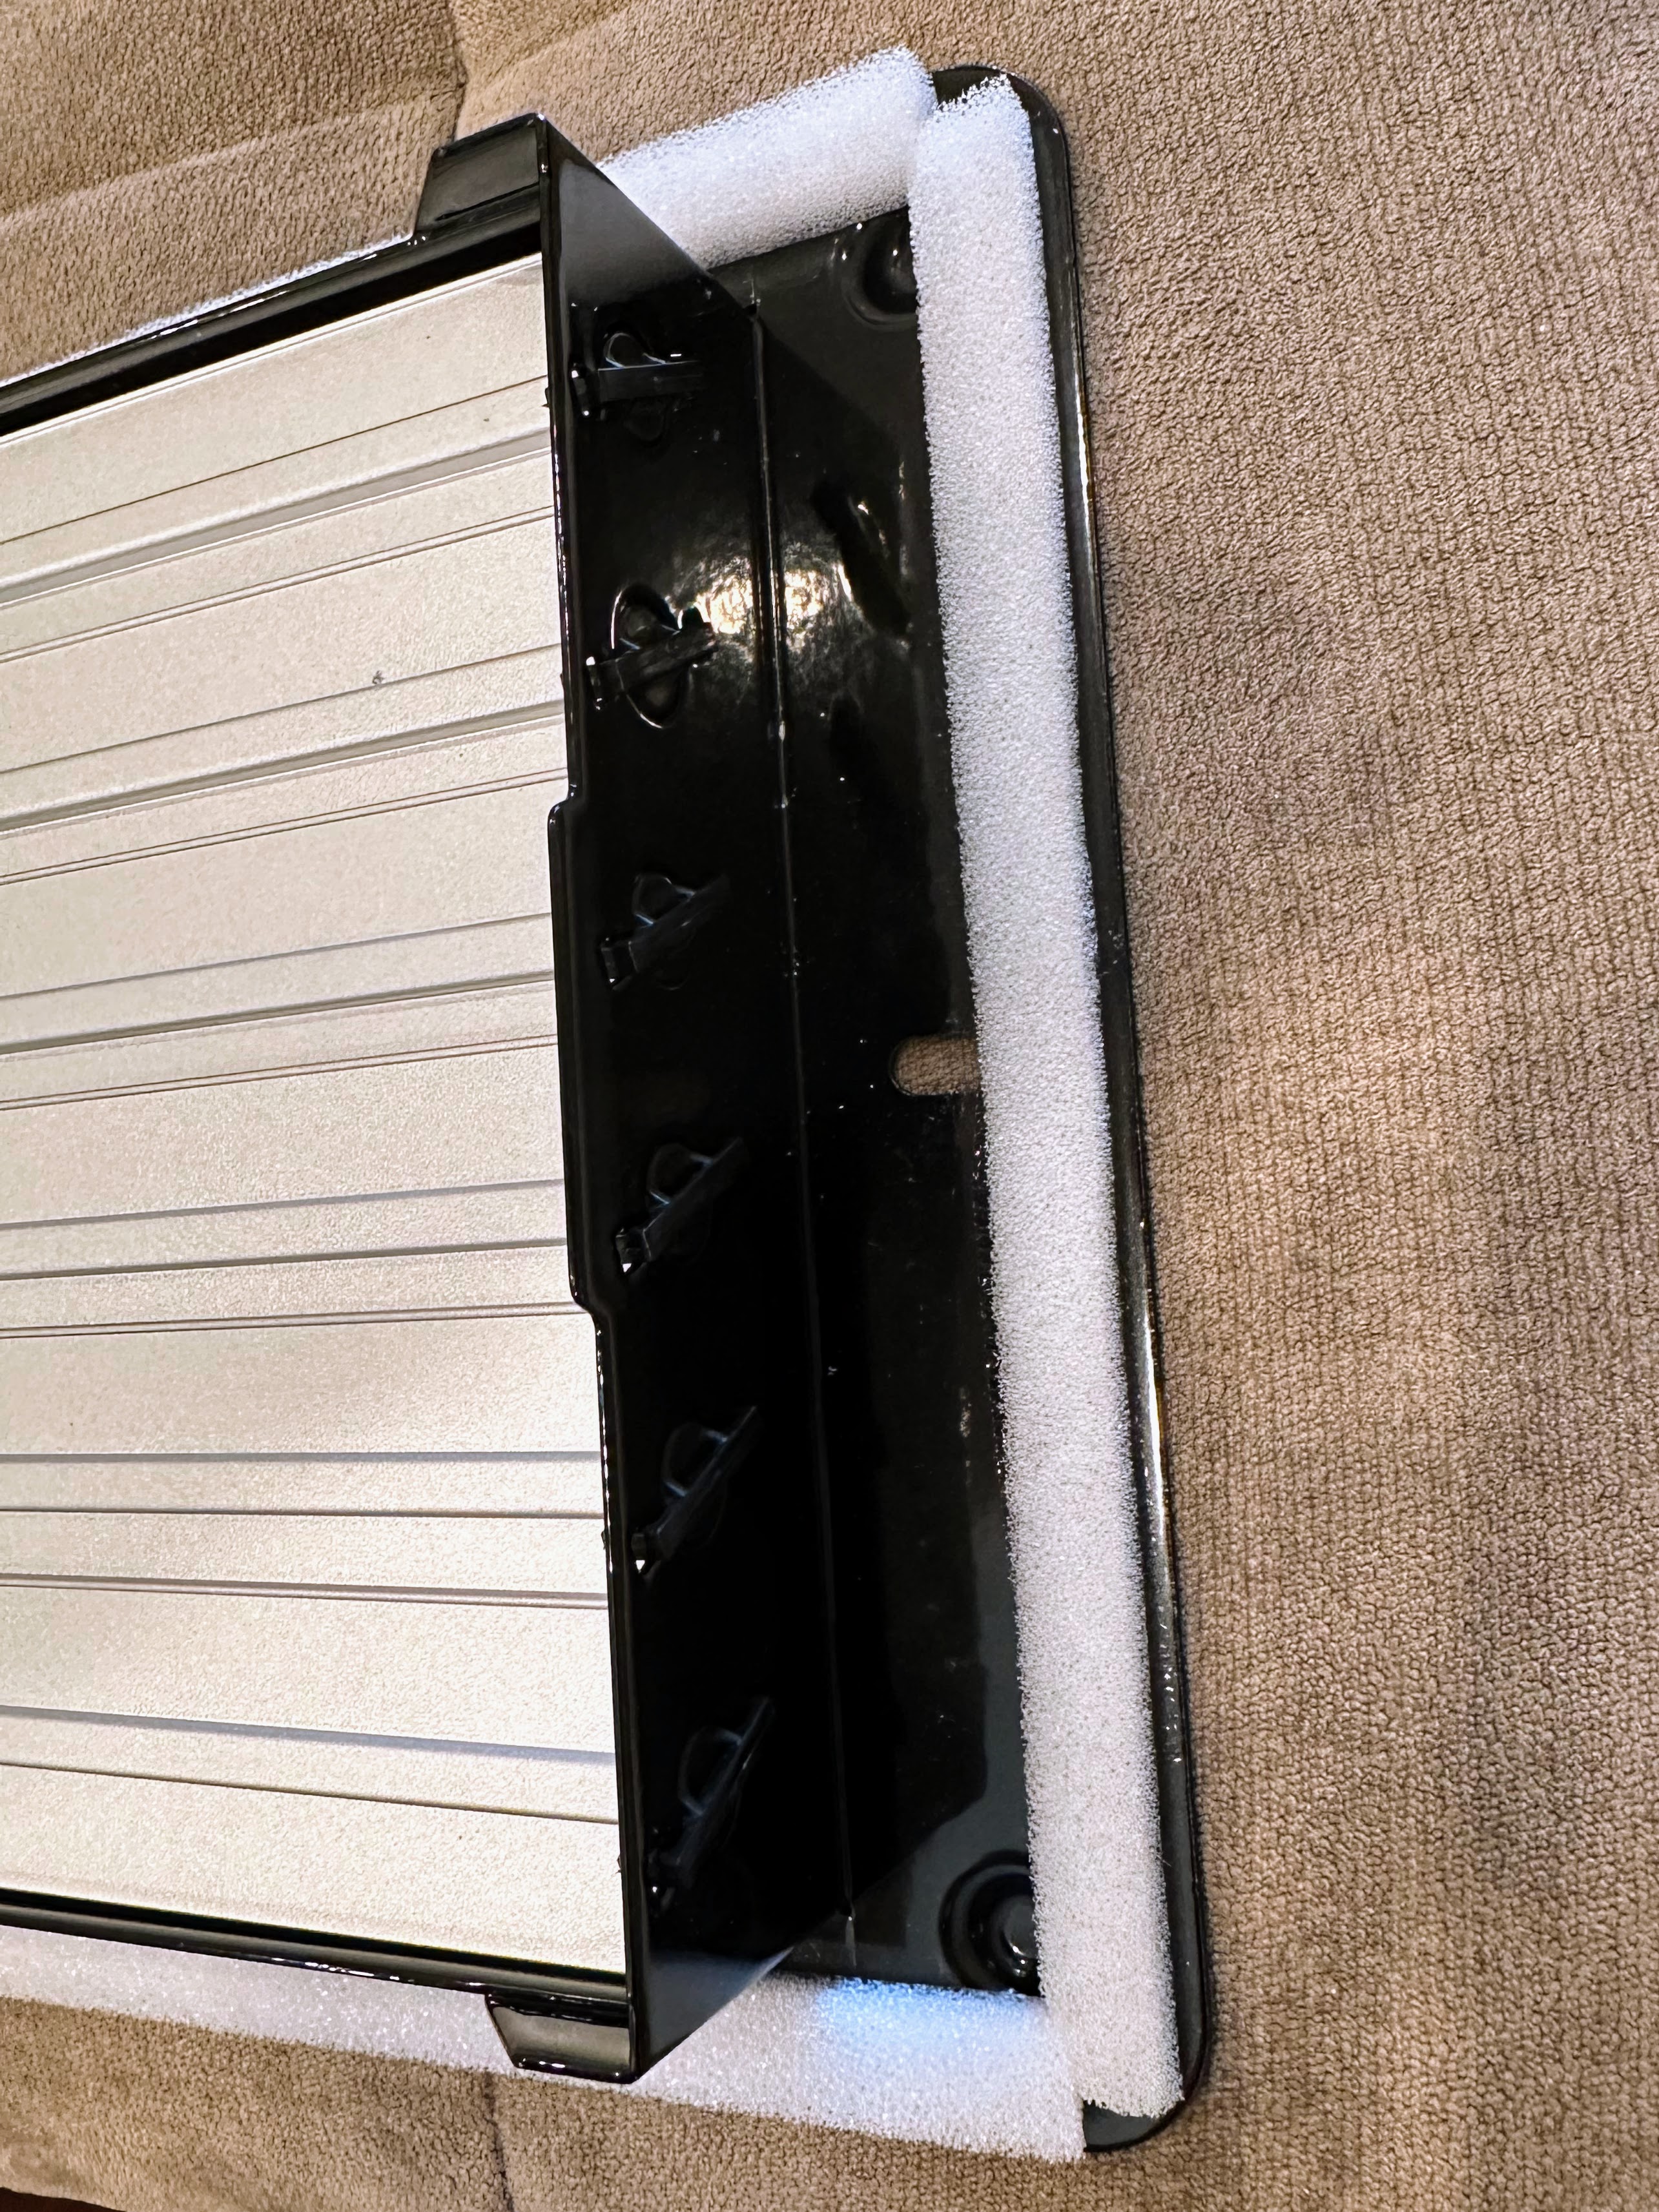
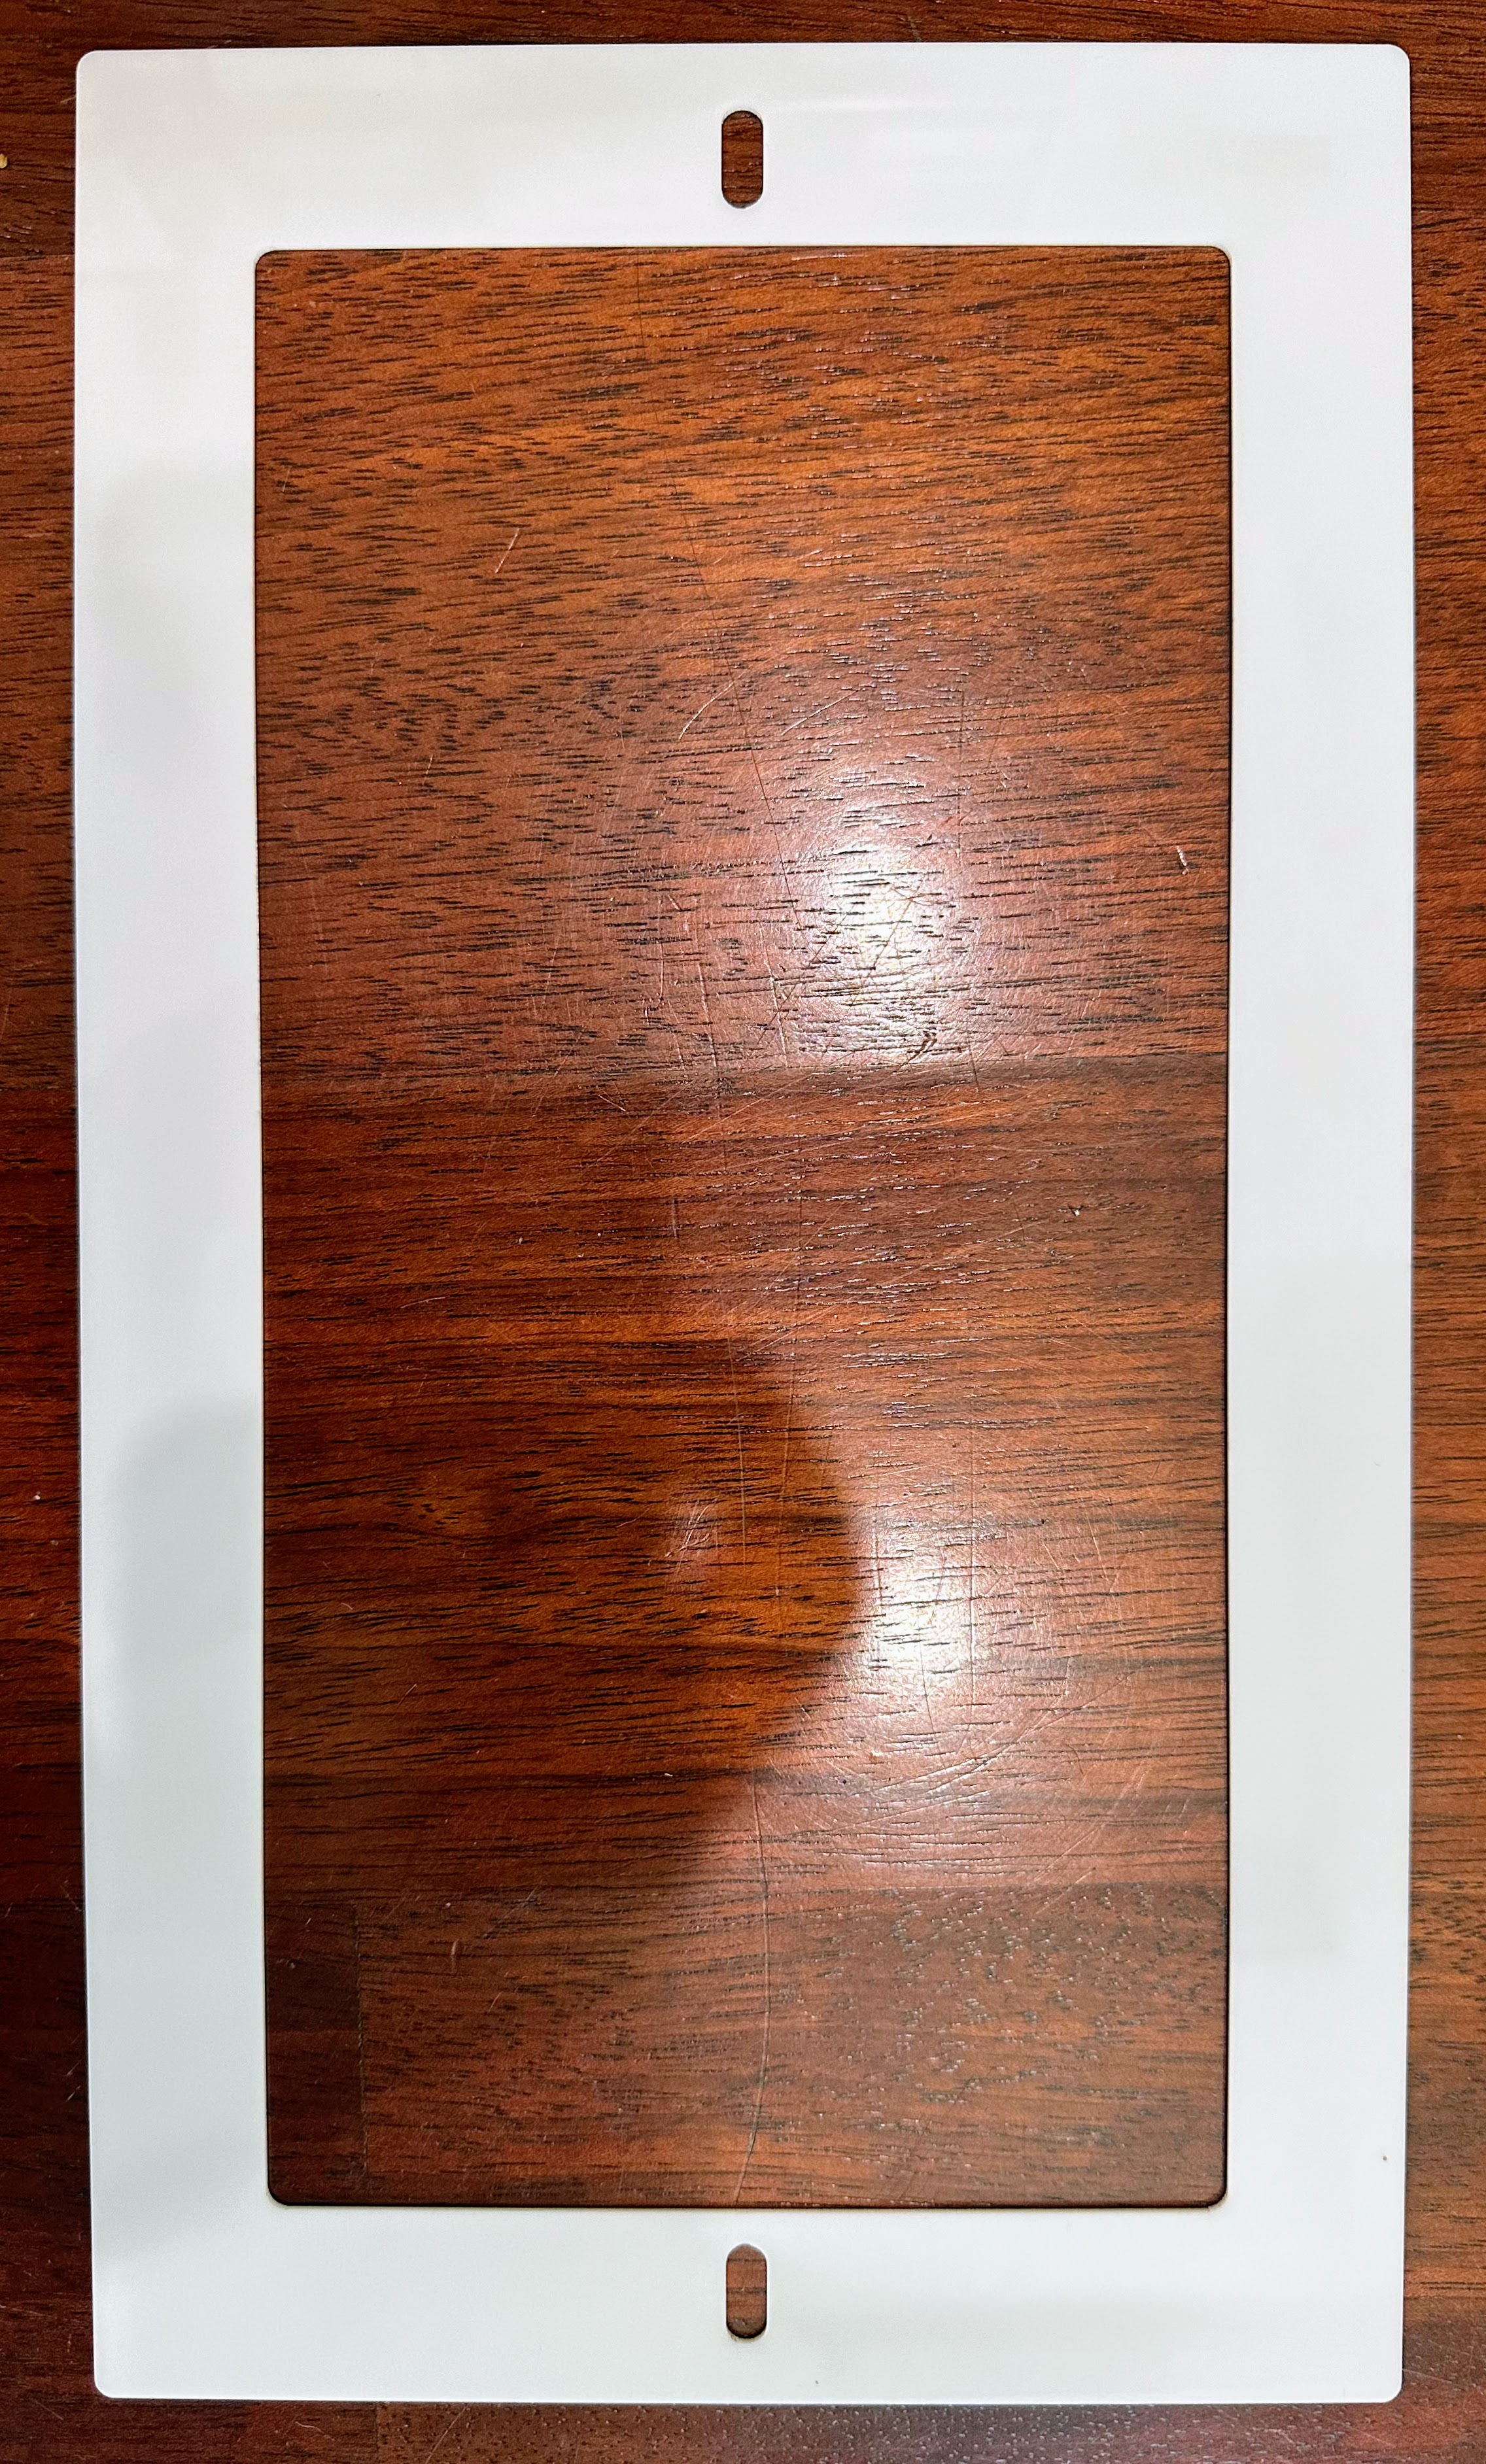
The Flair vents are longer but narrower than my current vents, and that was a big problem; I had different color paint or unpainted drywall exposed, rough ridges from previously painted vents, wall scratches, and the most troublesome was drywall openings larger than the Flair vents.
I ended up removing the old vents, and visited my paint store several times to color match various wall or ceiling colors, I sanded, caulked, and patched drywall spaces around ducts. It took several weekends of my time, I am not a great at drywalling or painting, the result is not very pretty, but the vents are up.


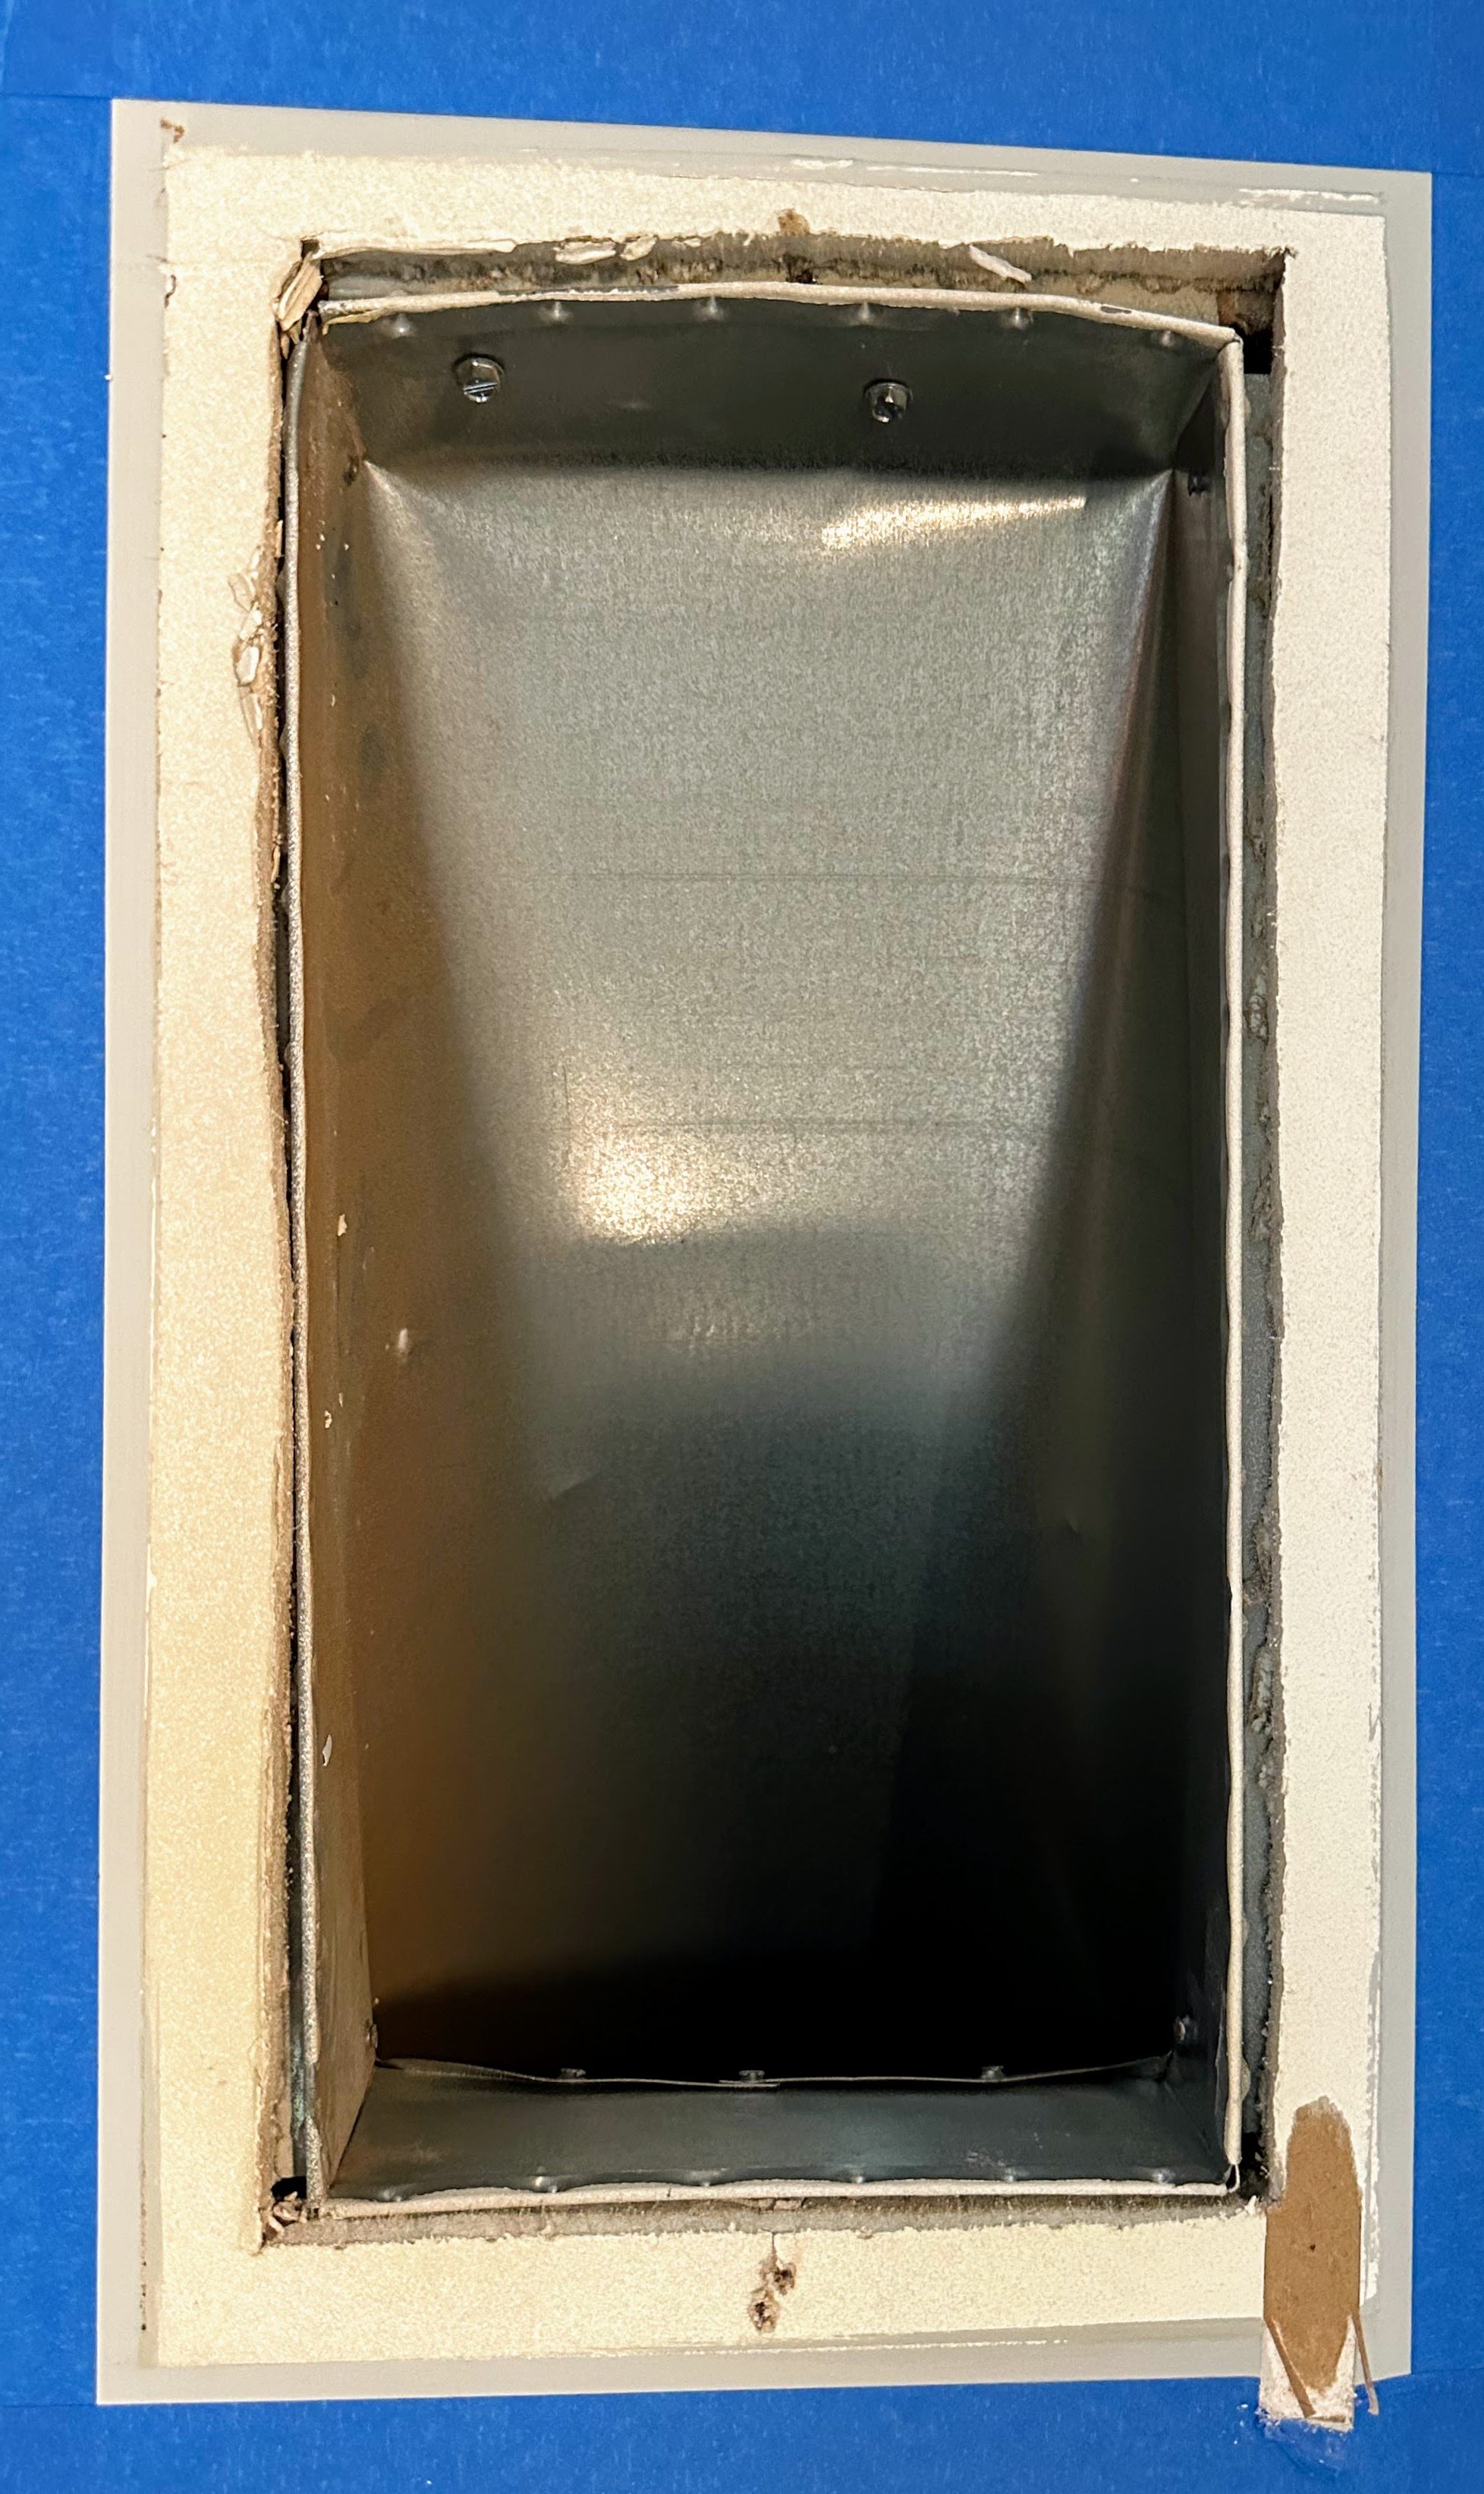

With all the trouble caused by the too narrow vents, I wondered if there was a standard to sizes, and if so, if Flair was following it. I researched vent sizes across several HVAC supply sites and hardware stores, and my conclusion is that the Flair vents are always longer and narrower than standard wall/ceiling vent sizes (I did not compare floor vent sizes).


In my opinion making the vents smaller than common sizes is a major design flaw, and I do wonder if Flair designers and engineers ever actually field tested the vents on real ceilings or walls, or if they only focused on drop in replacement floor vents? So unless you are are doing new construction, or have perfect paint and drywall, get ready for patching and painting.
Noise
After a few days of having a few vents installed, I noticed that when closed some vents would start making an annoying high pitched whistling noise. I removed a vent and found that there were gaps between the duct and the drywall, and I suspect that under pressure the air blowing through the gap into the ceiling cavity made the whistling sound. I first tried some stiff foam weather stripping around the vent edge, but I could not get the vent to seal tight with the duct, so I did it the hard way and patched the drywall cutout to the same size as the vent, and then caulked around the duct edge to seal it to the drywall. There is still some wind noise when the vent is closed, but no more whistling (or so I thought).


A day or so later I heard a familiar whistling noise again, and I found a vent that I did caulk and seal was now also whistling when closed. I removed the vent, double checked that it was properly caulked and sealed, it was. Thus this noise must be coming either from air blowing between the vent flange and the drywall, or from the screw slots on the long sides of the vent flange, or from the mechanical vent veins themselves. I can’t do anything about noisy vent veins, but I can try to seal the flange. I applied some soft thin foam weatherstripping around the edge of the vent flange, creating a tight seal between the vent flange and the drywall, and also covering the unused and open flange screw holes.
My initial attempt at using 3/8″ thick foam from my local hardware store was unsuccessful, the foam compresses very well, but not enough to sit flush with the wall. I tried again using 1/4″ thick foam, and that compressed well enough to seal the unused screw holes and sit flush with the drywall.

Flanges
As I was patching and painting, I wondered if there wasn’t an easier way to obscure the exposed paint problem, and I though of creating a thin flange to fit under or around the Flair vent, restoring the coverage to the original vent size, and thus obscuring any drywall damage or paint mismatches. If needed the piece could be painted to match the wall color, or left white to match the vent color.
I used Fusion 360 to create a prototype flange for a 12×6 vent that could be laser cut from thin rigid plastic.
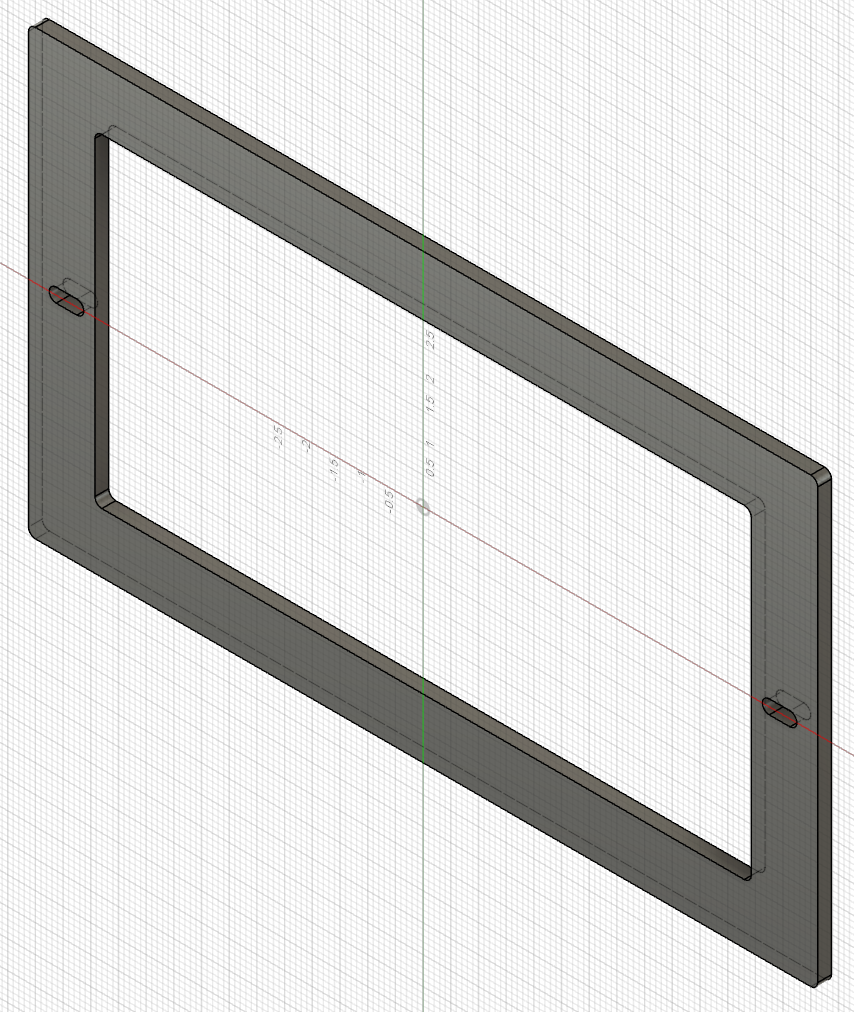
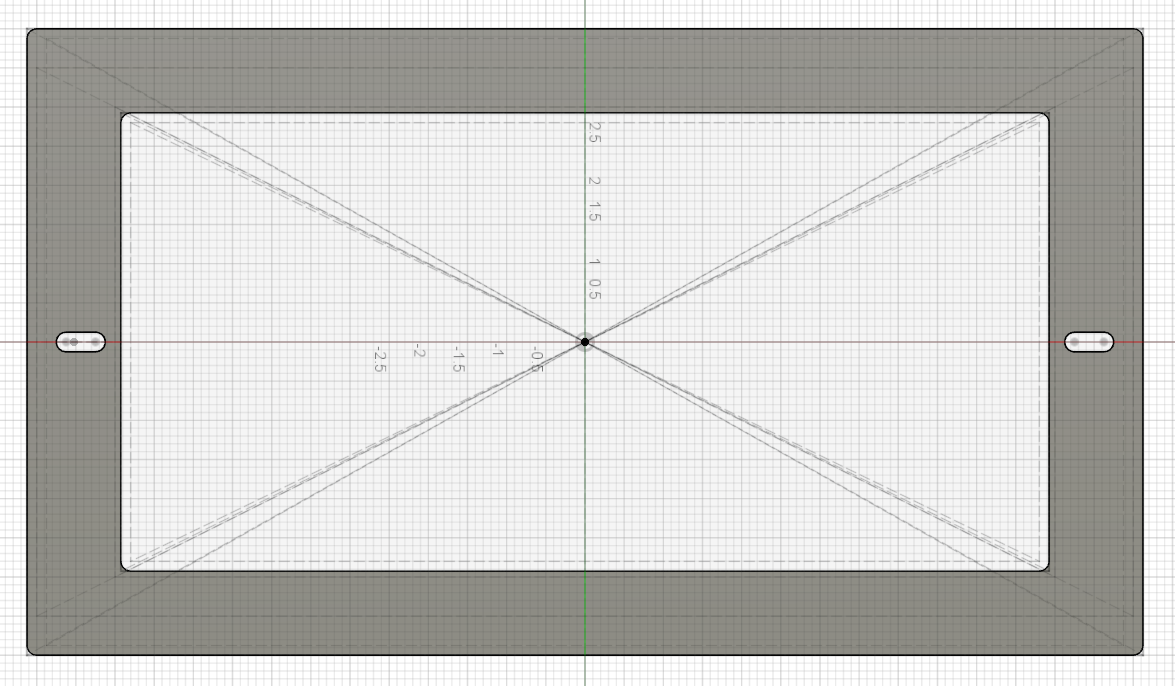
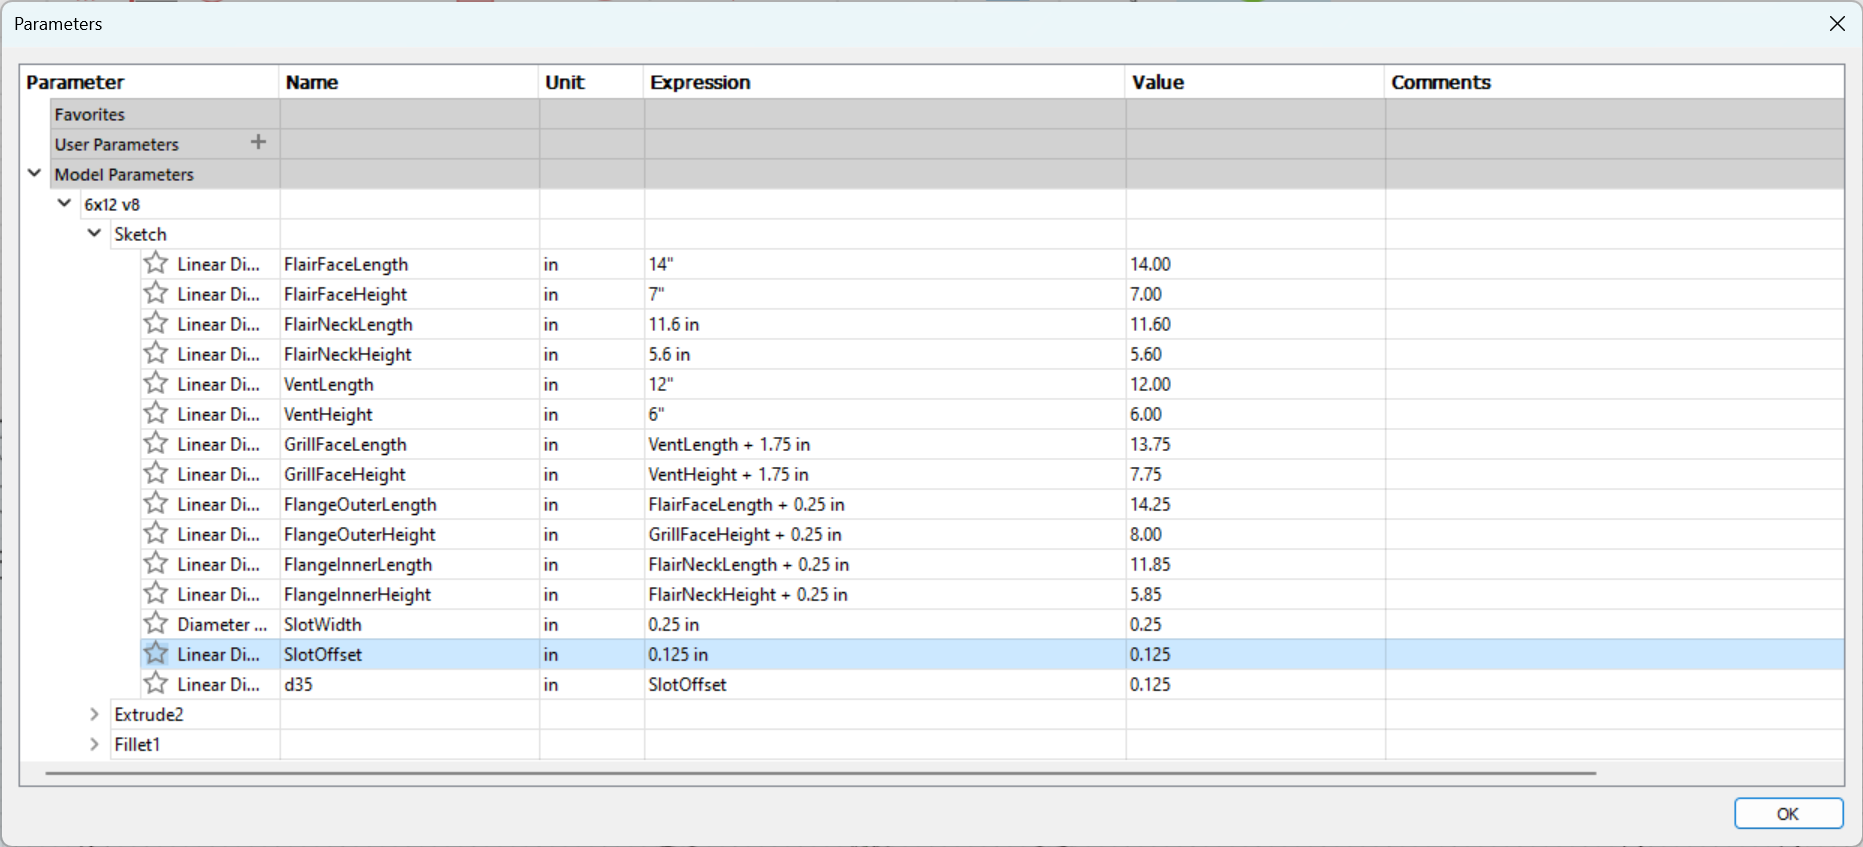
I looked for vendors with reasonable pricing and thin white paintable plastic material, Xometry was too expensive, SendCutSend did not offer anything thinner than 3mm, so I used Ponoko to cut a 1.5mm thick White Acrylic flange. The 0.8mm White Delrin will be thinner but is more than double the price of 1.5mm White Acrylic. I received the piece in a bout a week, and as designed it is just a tad larger than the original vent to help cover edge damage. As I already did it the hard way by patching and painting, I did not use the flange in my own installation, but I did test fit it and it would have worked fine.


I shared the Fusion 360 projects and DXF files in Autodesk Gallery, and I created a shared Ponoko cart with a ready to order 6×10 and 6×12 flange. For sizes other than 6×10 or 6×12 you will need to use Fusion 360 (free for hobby use) and adjust the dimensions in the sketch ([modify], [change parameters]), then export the projection as a DXF file.
Flair could always include a color matched flange with the vent kit, similar to how Ecobee includes a backing plate to cover holes left by larger footprint thermostats.
Setpoint Controller
Now that all the vents were installed, I wanted to configure the system for optimum use of the sensors and vents, and I assumed that Flair as setpoint controller would be superior to using Ecobee, but disappointingly Flair, just like Ecobee, uses the average temperature of all sensors. I am no HVAC or thermodynamics expert, but having the ability monitor per room temperatures and control per room vents, even with only one HVAC system, this sure seems like a missed opportunity to improve upon Ecobee.
If it is not already obvious, let’s look at a simplified example demonstrating the problem of using average temperatures:
- Summer weather and mode set to Cool at 72°F setpoint.
- Room1 baking in the sun with the curtains open at 80°F.
- Room2 shaded with the door closed and curtains drawn at 74°F.
- Average temperature is (80+74)/2=77, and 77>72, so HVAC turns on and calls for cooling.
- Room2 quickly cools down to 72°F.
- Room1 is still baking and is cooling slowly at 76°F.
- Average temperature is (76+72)/2=74, and 74>72, so HVAC still calls for cooling.
- Room2 continues cooling and is now cold at 68°F.
- Room1 is still hot at 74°F.
- Average temperature is now (74+68)/2=72, and 72==72, so setpoint reached, and HVAC turns off.
- Room2 is in the shade and the temperature remains mostly stable or rises slowly.
- Room1 is still exposed to the sun and starts warming again as soon as the AC turns off.
- Average temperature again exceeds setpoint and AC turns on.
- Room2 keeps getting colder.
- Room1 now starts getting warmer as Room2 gets even colder, because the average temperature remains the same, and the HVAC satisfies.
- Room1 is too hot and Room2 is too cold, everybody is unhappy, but HVAC is satisfied.
By adding vent control the excessive cooling in Room2 can be reduced, and the delta temperature between the rooms should be lower.
Given that the use of Flair as setpoint controller requires disabling Ecobee comfort settings and deleting Ecobee schedules, and then recreating schedules in Flair, and Flair offering nothing more than also jsut averaging temperatures, I saw no benefit worth the effort, and left the Ecobees to control the setpoint.
Operating Mode
As winter approached it was getting colder at night, and one morning it was too cold downstairs and I switched the downstairs HVAC from cooling to heating mode, while leaving upstairs in cooling mode. Yes, it is a bit weird to have different modes enabled, but it was 55°F (13°C) at night and 77°F (25°C) in the day, so too cold downstairs in the morning and too hot upstairs at night. And at the time convenient to just change the mode on the Ecobee controller vs. getting my phone and switching both units to auto mode.
Later the day I wondered how Flair will treat the different modes, and after I logged in I observed that the UI was confused, switching from red and heating mode one moment to blue and cooling mode the next. I verified that Ecobee was correct, heating downstairs and cooling upstairs, so something weird with Flair. In looking at the Flair UI one can see that there is only one operating mode reported, while each of the Ecobee thermostats can individually control heat/cool/auto/off modes.
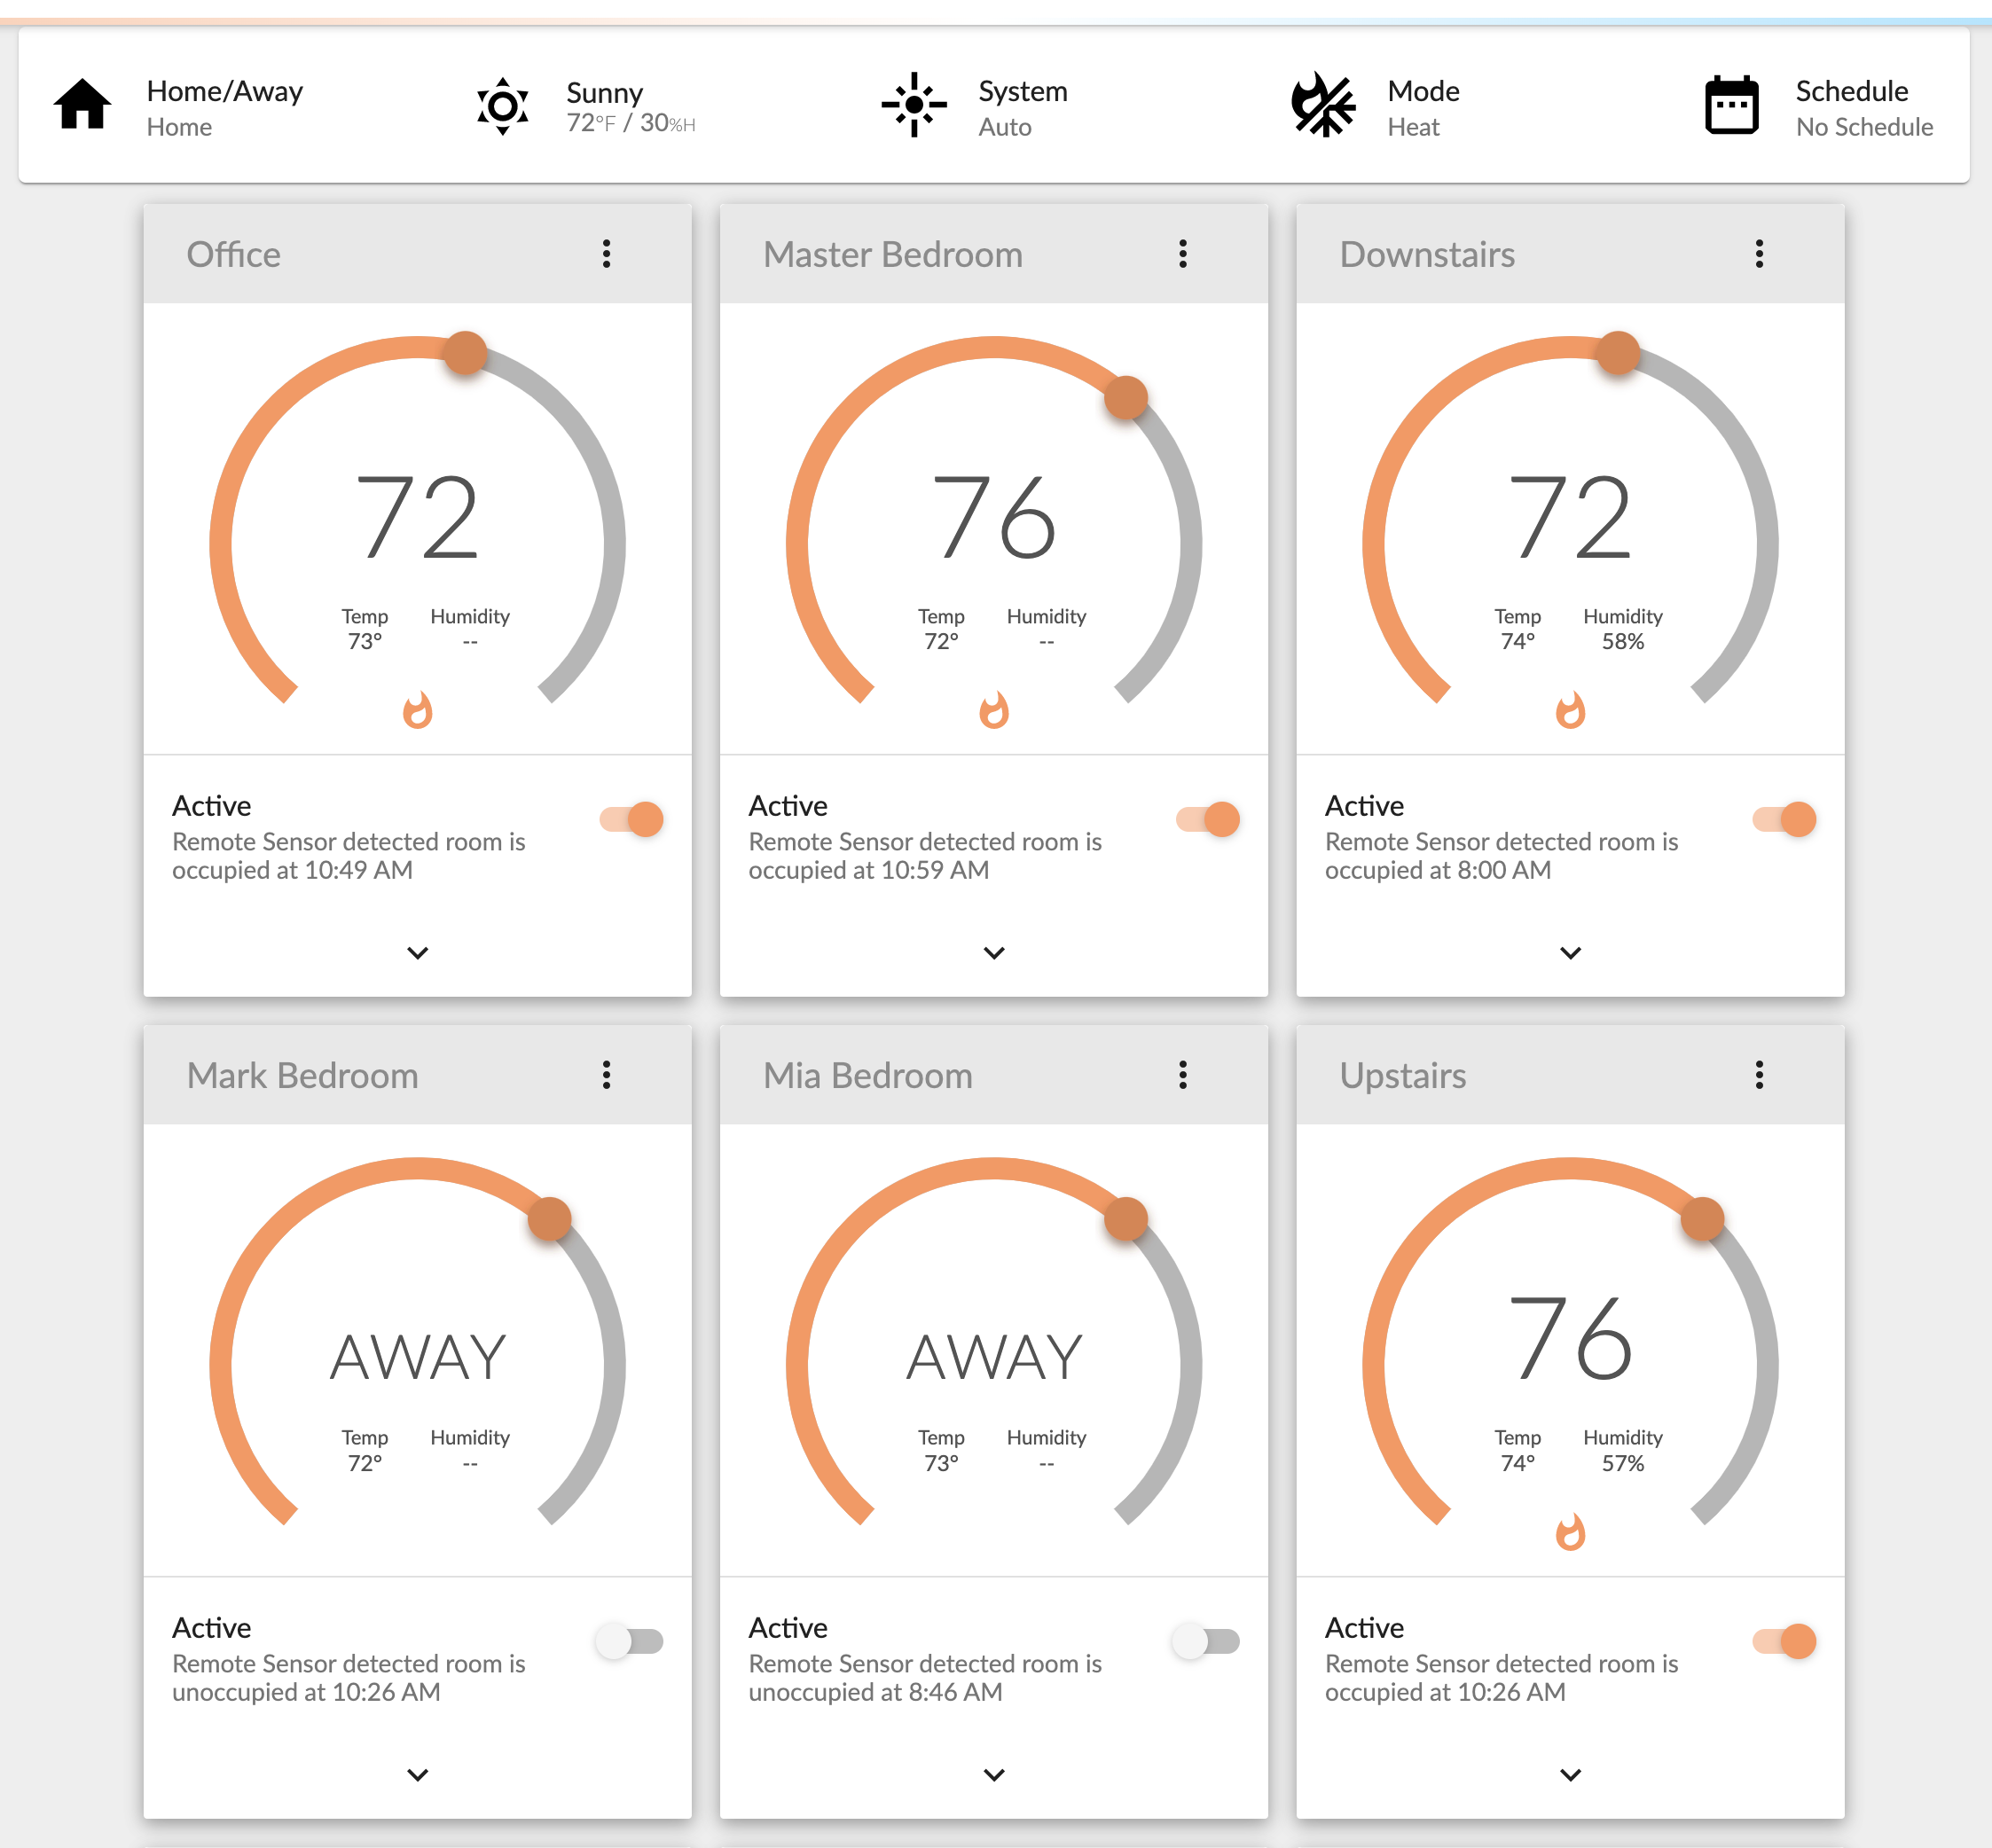

I posted my concern on the Flair forum, and support responded that I have to create multiple logical homes if I want to run the units in different modes. This does not make sense, imagine I have multiple mini-split units, do I need to create a home for each mini-split? I contacted support directly, and they confirmed that all HVAC units must be set to the same mode. If this is a requirement, and the UI gets confused when not correctly set, I’d expect Flair to at least give a warning of an unsupported configuration.
With both Ecobee thermostats set back to Auto, I change the mode from within the Flair UI to Heat, expecting both Ecobees to switch to Heat mode. Instead the Ecobees switched to Heat and a Hold at 75°F, where 75°F seems to have been the current measured temperature. I had to manually remove the hold from both Ecobees to resume normal scheduled operation. This was again confusing and unexpected behavior.

I have not yet tested Flair as setpoint controller, but for now I’ll refrain from making any temperature changes from within the Flair app, and stick to using the Ecobee app.
Conclusion
I’ll summarize my experience and opinions as follows:
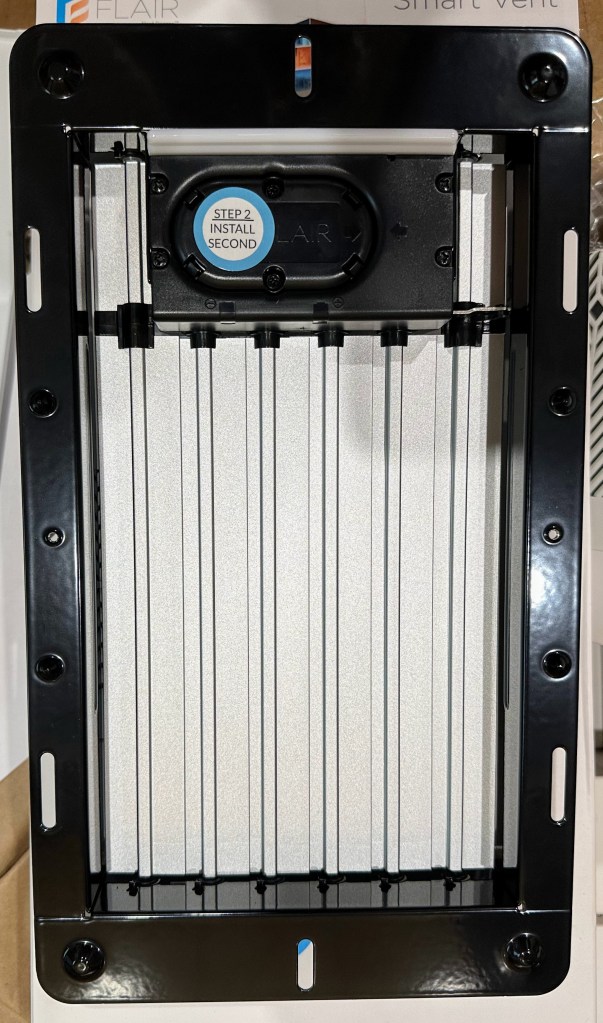
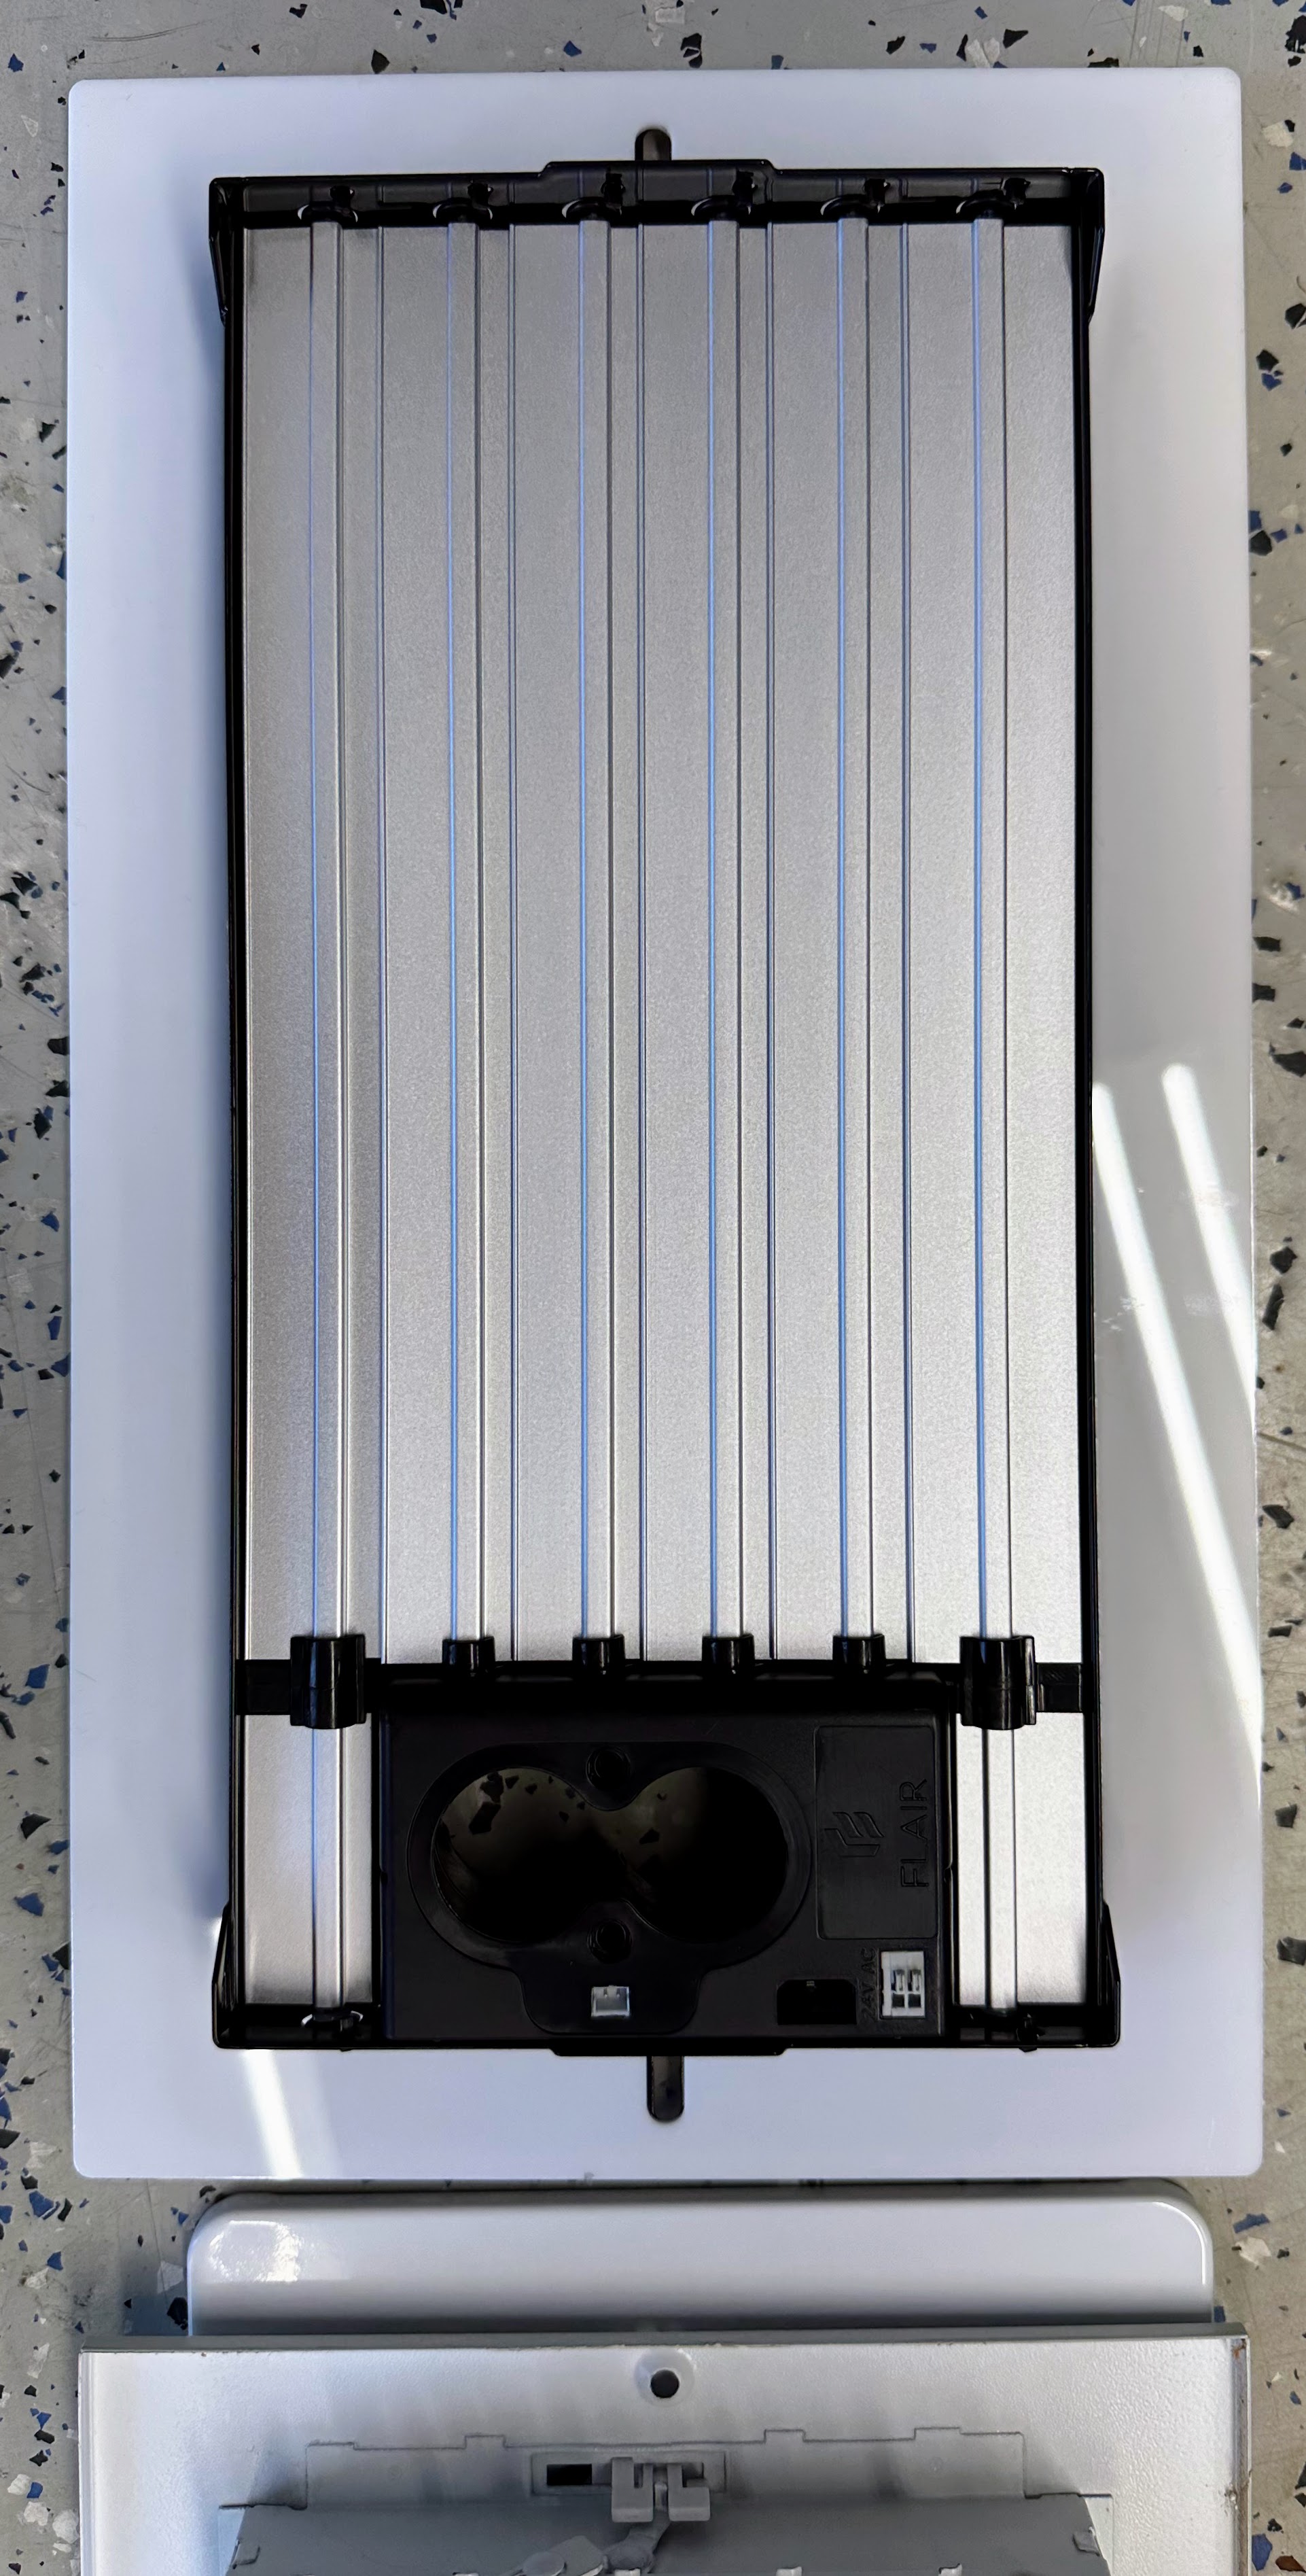
- Vent construction is solid and of high quality. Also much heavier than the vents I replaced, I assume to be rigid enough to be used for floor vents.
- Initial setup of the iOS app and system was easy following standard methods of IoT WiFi binding.
- Initial setpoint controller selection and configuration was confusing. Selecting the correct mode is important, it should be an explicit configuration step.
- The Flair support forum is not very active, and forum posts or direct support requests take, in my experience, about 3 days to get an answer, a tad long.
- System offline email notifications do not contain a fault reason, and are not followed by a return to normal online operation notification, so one has to manually check if and why the system is offline. Flair support confirmed they do not send recovery alerts, while my expectation is to be alerted of faults and of recovery, as is pretty standard in other systems.
- Puck seems expensive for what you get, no color, no touch, clunky tactile feel, on the plus side it is small and has a battery backup. For the price I would expect at least a color touchscreen.
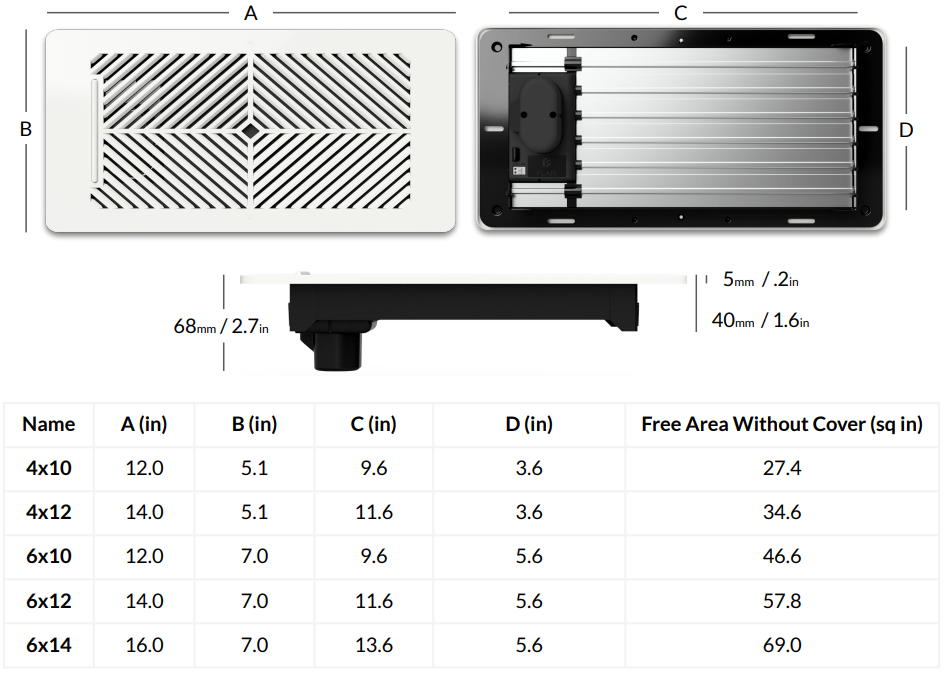
- Limited vent size selection, e.g. we use 10″x10″ vents that are not available. The support postings say more sizes are coming, but based on article and forum post dates, they have have been saying that for years.
- Flair as setpoint controller only offers temperature averaging, nothing more advanced. I was disappointed that more advanced capabilities, at least room prioritization was not offered, I feel this is a missed opportunity.
- Multiple independent (heat/cool/auto/off) HVAC systems are configurable, but not functional in the same house when using different operating modes. The Flair UI gets confused when mixing modes, and Flair requires all HVAC units to be in the same operating mode at the same time, but does not warn of such a misconfiguration. I feel this is a major oversight, imagine using split units and needing to create a logical home for each unit, weird.
- Controlling the Ecobee as setpoint controller from the Flair app results in weird states, e.g. changing Ecobee from Auto to Heat results in a heat mode and hold at whatever the current temperature was, requiring a mode reset from the Ecobee app in order to resume expected operation. I’d suggest not to make any changes from the Flair app unless Flair is the setpoint controller.
- High pitched wind noise when the vents close, caused by air leaks between the duct and drywall, and gaps between the vent and drywall, and vent veins. Caulking the gaps between the duct and drywall, and adding foam seal to the vent flange alleviates most of the whistling noises.
- The biggest issue, in my opinion, is that the Flair vents are smaller than standard sized wall and ceiling vents, exposing drywall and paint damage covered by the old vents, so be ready to patch and paint. My installation could have been so much easier if the Flair vents were the same size or a bit larger, or if Flair included a flange plate, made me wonder if Flair actually tested installing their vents under real conditions. If your drywall and paint looks like mine, I’d suggest using the laser cut flanges to conceal the ugly spots vs. more troublesome patch and paint.
- On the plus side, early indications are that the vents are resulting in more even room temperatures, which is the ultimate goal.
There is opportunity for improvement, especially in vent sizing and setpoint controller configuration and capabilities, but I am hopeful of the temperature control outcome. Summer is all but gone so not much to report on improved cooling behavior, but I’ll keep notes this winter and next summer, and write a follow-up by next year.
If ordering from Flair use my referral code for 10% off and free shipping, or order from Amazon for Free Prime Shipping.
Update – 20 January 2025:
It has now been more than 3 years since I installed the vents, I’ve done multiple summer and winter seasons, and they work amazingly well. I did end up replacing two vents that kept whistling. Flair did send me the silicone strip kits to glue on and try to remedy, I tried one vent, was not very successful, so just replaced the vents and problem solved. I also replaced the pucks with gateways, was hoping for better signal coverage, but ended up having to add as many gateways as I had pucks to prevent vents dropping out. So all in very happy.

You must be logged in to post a comment.